
This workflow tutorial shows you how to create a marketing video in After Effects that includes your 3D can model (an energy drink in this tutorial).
The downloadable folder below has my complete PIXELPOP Marketing Video made in After Effects. We’ll dig into that project so you can better understand how 3D works and see firsthand the settings and effects I used.
You can use my file as a template for your own marketing video. Just customize it to fit your own can design, brand, attitude, and style. This is only a 7-week course—it would take twice as long to truly learn and understand all the nuances and skills built into this example. So I chose the best path forward: using a prebuilt template to introduce you to creating 3D objects in Illustrator and bringing them to life in After Effects. 3D is fun. Buckle up : )
Remember, don’t stress yourself out trying to be the After Effects guru. You’ll be hired as a designer who understands marketing and can tell a compelling visual story with After Effects.
Download the PIXELPOP – Marketing Video tutorial folder with assets here: PIXELPOP – Marketing Video.zip
Here’s the video I made for reference
The Process We’ll Follow
- Create your 3D can model/object in Illustrator (previous tutorial)
- Export it from Illustrator as a .gltf 3D model file (previous tutorial)
Gltf (Graphics Language Transmission Format) is an open standard file format used to efficiently store and transmit 3D models and scenes. Sometimes called the “JPEG of 3D” because it provides a lightweight, fast-loading way to display 3D content across the web, apps, and games. - Import it into its own After Effects composition and set it into motion (in a separate composition)
- Import the can animation composition into your final After Effects marketing video
- Create/design your final After Effects marketing video
- Render your final video
Swap your 3D can design with mine
In the downloaded tutorial file (PIXELPOP – Marketing Video), I included a second 3D can design so you can practice replacing the current can in After Effects. We’ll practice this now, and when your 3D can design is ready, you’ll replace my can with yours.
- In the downloaded PIXELPOP – Marketing Video folder, open the AE file: PIXELPOP – Marketing Video.aep
- In the Project window, locate the 3D can file you want to swap out
- Right-click it and choose: Replace Footage
- Navigate to the PIXELPOP – Marketing Video folder and select the file: 3D Can Swap Test – Red.gltf
- Click OK to swap it
Setting Up After Effects for 3D
Since I’m giving you the complete project file to begin with, you won’t need to do this for the main 1920 x 1080 video file. However, you will want to know this if you create your own asset comps for your project. This is how I set up my main file’s comp, camera rig, and lighting.
1. Set Up the 3D Engine & Import the Model
- Open After Effects and select New Composition (1920 x 1080, 30fps, 15 seconds)
- Go to Composition > Composition Settings > 3D Renderer.
- Set the Renderer dropdown to Advanced 3D and click OK.
- Import your 3D model (.obj, .gltf, or .glb) into the Project panel.
- Drag the 3D model layer into your Timeline composition.
2. Create the Orbit Camera Rig
- Go to Layer > New > Camera.
- Select Two-Node Camera and click OK.
- With the Camera layer selected, click Create Orbit Null in the top toolbar (or right-click the Camera layer and select Camera > Camera Orbit Null).
Key Concept: Your camera is now parented to a Null Controller layer. To orbit or move around your 3D object, animate or rotate the Null Controller’sY-RotationorPositionproperties—do not move the Camera layer directly.
3. Build a 3-Point Lighting Setup
Because native lights in After Effects exist as individual layers, create three separate light layers via Layer > New > Light:
- Key Light: Point Light | 100% Intensity. Position: Above and to the front-left of your object. Main light source.
- Fill Light: Point Light | 35–50% Intensity. Position: Opposite side (front-right) to soften harsh shadows.
- Backlight: Point or Spot Light | 75% Intensity. Position: Behind the object, pointing forward toward the camera to separate the model from the background.
- (Optional) Environment Light (Crucial for Dark/Black Objects)
- Black materials rely almost entirely on reflections to show their 3D shape rather than diffuse color.
- Go to Layer > New > Light.
- Set the Light Type to Environment.
- Choose a default HDRI map/environment image provided in After Effects (or lower its intensity to roughly 20%–40%).
- Result: This provides soft, ambient light from all angles, giving the dark black can realistic edge reflections and subtle metallic/plastic highlights without blowing out the label.
4. Import your 3D GLTF object (just to test it) into After Effects
- In After Effects, after you’ve made your composition, File > Import (or drag your file into the Projects window)
- Find and select your 3D model file (.gltf), then click Import
- The object will appear in your Project Window (on the left of the screen)
- Drag it into your Timeline (bottom of screen)
- Object Scale: 200%. Object position while scaling: Do not affect position.
- Expand your layer and, under Transform controls, adjust the X, Y, and Z coordinates to get familiar with the 3D environment.
- I strongly suggest you manipulate your 3D object in the layer controls going forward, and not try to adjust the object itself in the composition window.
5. Test & Verify Your Camera Setup
- Layer > New > Torus
- Position the 3D Torus object next to your 3D can
- Expand the 3D Torus object layer (Cube Mesh Layer) and under Transform, set the X Rotation to +90°
- Select the Camera Orbit Null layer in your timeline.
- Adjust the Y-Rotation property to orbit the camera around your two objects.
- Verification Checklist:
- The camera orbits smoothly around the stationary 3D object.
- Highlights and shadows shift dynamically across the model’s surfaces as it moves relative to the lights.
- The 3D model displays true volume and depth rather than rendering flat.
Three Separate Compositions in After Effects
To keep things organized and not too confusing, I animated my 3D can in three separate compositions within one project file (note: not 3 separate After Effects projects, or .aep files). These three “asset comps” animate the can to match what I want it to do in my three specific scenes.
My PIXELPOP marketing video has three asset comps:
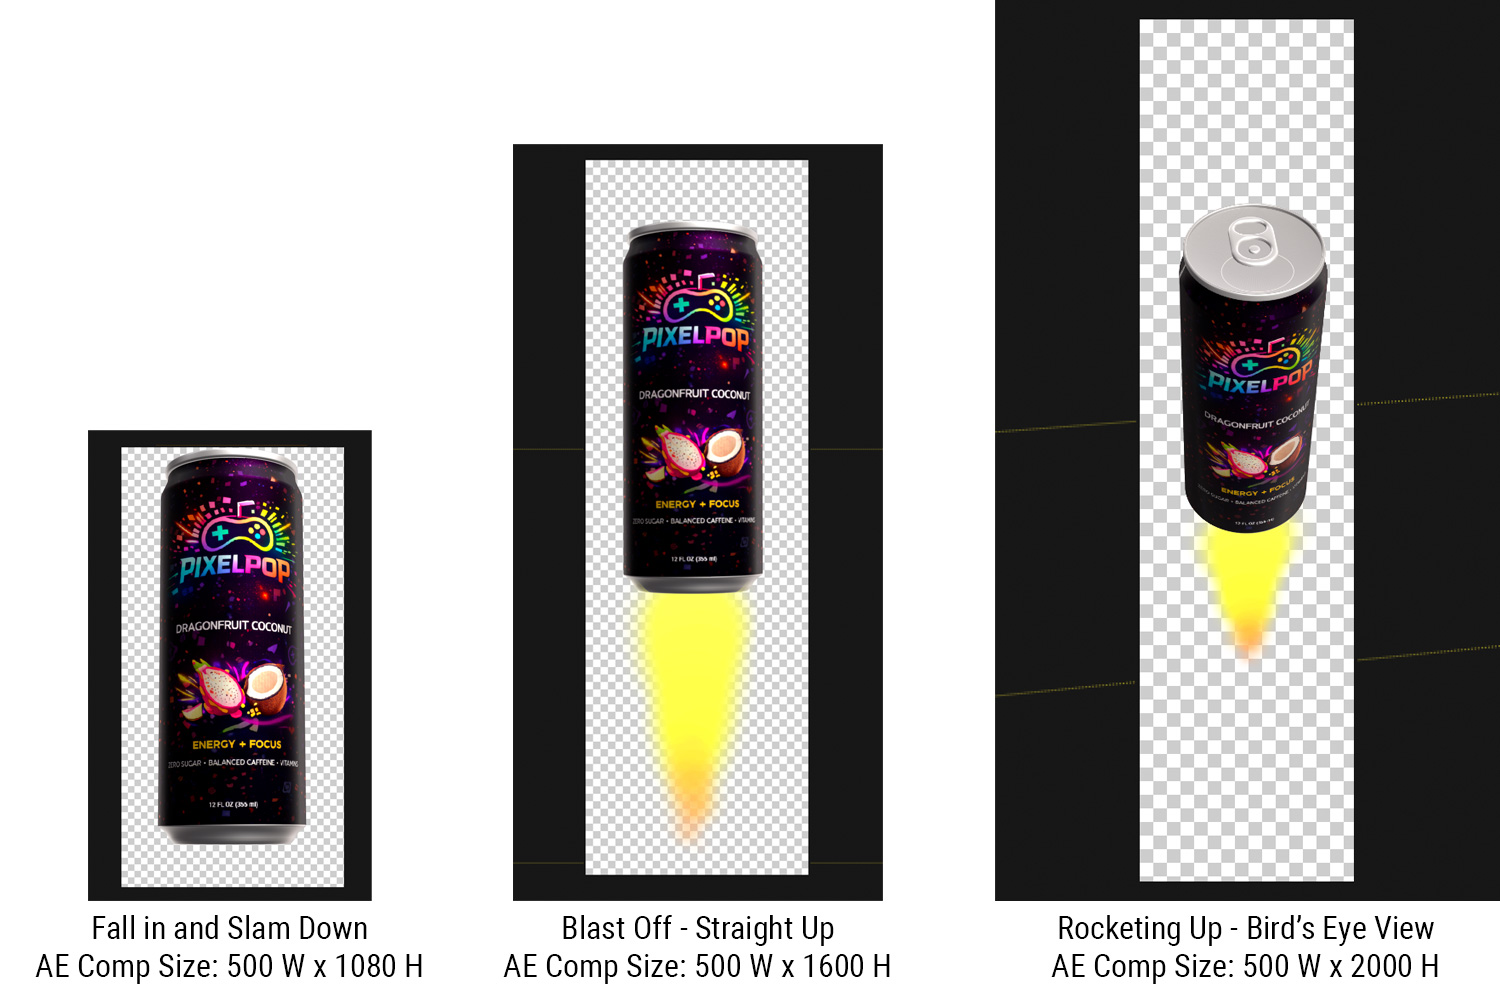
I’ll give you these files in class and show you how to swap your 3D object with mine. I’ll also walk through how I made these asset comps in class.
Pre-Comping Assets in After Effects
Using nested compositions (pre-compositing) is a standard industry technique that will save a ton of frustration.
Isolating the 3D model, its lights, and its camera setup in an “Asset Comp” before bringing it into the final “Motion/Assembly Comp” offers several key advantages:
Why Pre-Compositing Works Well for Students
- Separation of Space vs. Motion: You can lock down the lighting, environment reflections, and angle of the 3D can inside the Asset Comp without accidentally messing up those settings when keyframing position or scale across the screen in the main comp.
- Simplifies Spatial Math: Moving a 2D pre-comp layer across a 1920 x 1080 frame using standard X and Y position keyframes is far more intuitive for beginners than navigating 3D camera paths, focal distances, and Z-depth bounds all at once.
- Reuse and Iteration: If you need to change the beverage label design or adjust the lighting highlights later, you update it once inside the Asset Comp, and every instance or keyframe pass in the main comp updates automatically.
A Crucial Technical Setting to Keep in Mind
If you want After Effects to render the 3D depth and light interactions continuously inside the final composition, make sure to use the Collapse Transformations toggle:
- Collapse Transformations Icon: On the pre-comp layer inside the main timeline, click the little sun/gear icon (located between the layer switches).
- When to leave it OFF: If you want the pre-comp to act like a flat, pre-rendered 2D sticker or graphic that simply moves across the 1920 x 1080 frame (fastest performance).
- When to turn it ON: If you add additional 3D layers or lights in the main composition and need the 3D beverage can to interact dynamically with the main scene’s 3D space.
Tying It Back to the Camera Setup
If the 3D can will spin or rotate on its own axis inside that Asset Comp while sitting still in the center of the frame, you don’t even need a camera rig—you can simply rotate the 3D model’s Y-Rotation directly.
However, if you want to show a slightly angled or isometric perspective on the top rim or tab of the can while it spins, keeping a basic single Camera in that Asset Comp (set once and left unkeyed) gives you an easy way to dial in that initial viewing angle.
Overall, breaking complex 3D projects into modular, pre-comped passes is one of the best habits you practice!
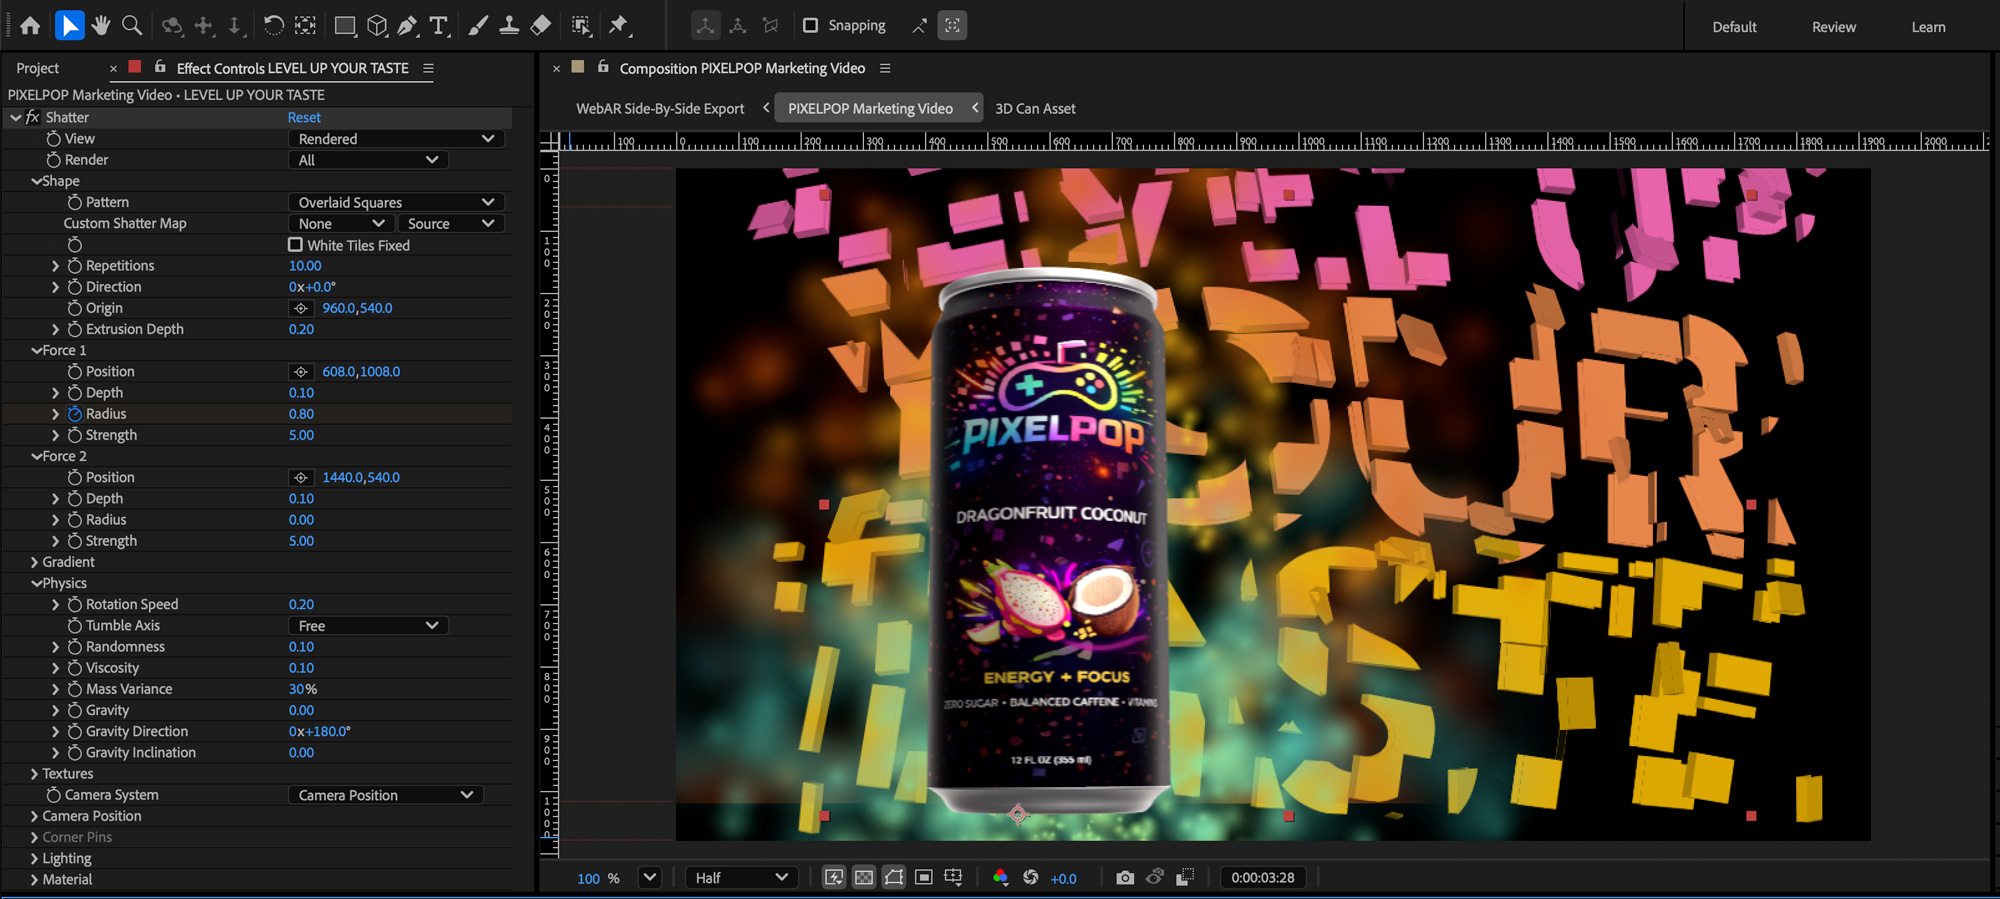
Shatter Text with the “Shatter” Effect
- Select your text layer and go to Effect > Simulation > Shatter.
- In the Effect Controls panel, change the View drop-down from Wireframe to Rendered to see your actual text.
- Open the Shape menu and change the Pattern from Brick to Overlaid Squares
- Open the Force 1 drop-down menu:
- Locate Position—this is your center point. Click the crosshair icon next to it and click anywhere on your composition window to set the exact point where you want the explosion to blast outward from.
- Open the Physics drop-down menu and set Gravity to 0.
- Why? If gravity is left at the default setting, your text pieces will explode outward and immediately fall to the bottom of the screen. Setting it to 0 keeps them flying outward cleanly into space.
Start Shatter Effect in the Timeline
- Select your text layer and make sure the Shatter effect is applied.
- Move your Current Time Indicator to your desired location/time in the timeline/time ruler.
- Expand the text layer in your timeline and expand the Force 1 drop-down menu.
- Set the Radius value to 0 and click the stopwatch icon next to it to create your first keyframe.This keeps the blast size at zero, so the text stays perfectly plain.
- Move forward just one frame on your timeline.
- Change the Radius value to 0.2 (or higher). This opens up the explosion force, causing the text to shatter on that exact frame.
Fireworks & Explosions with CC Particle Systems II
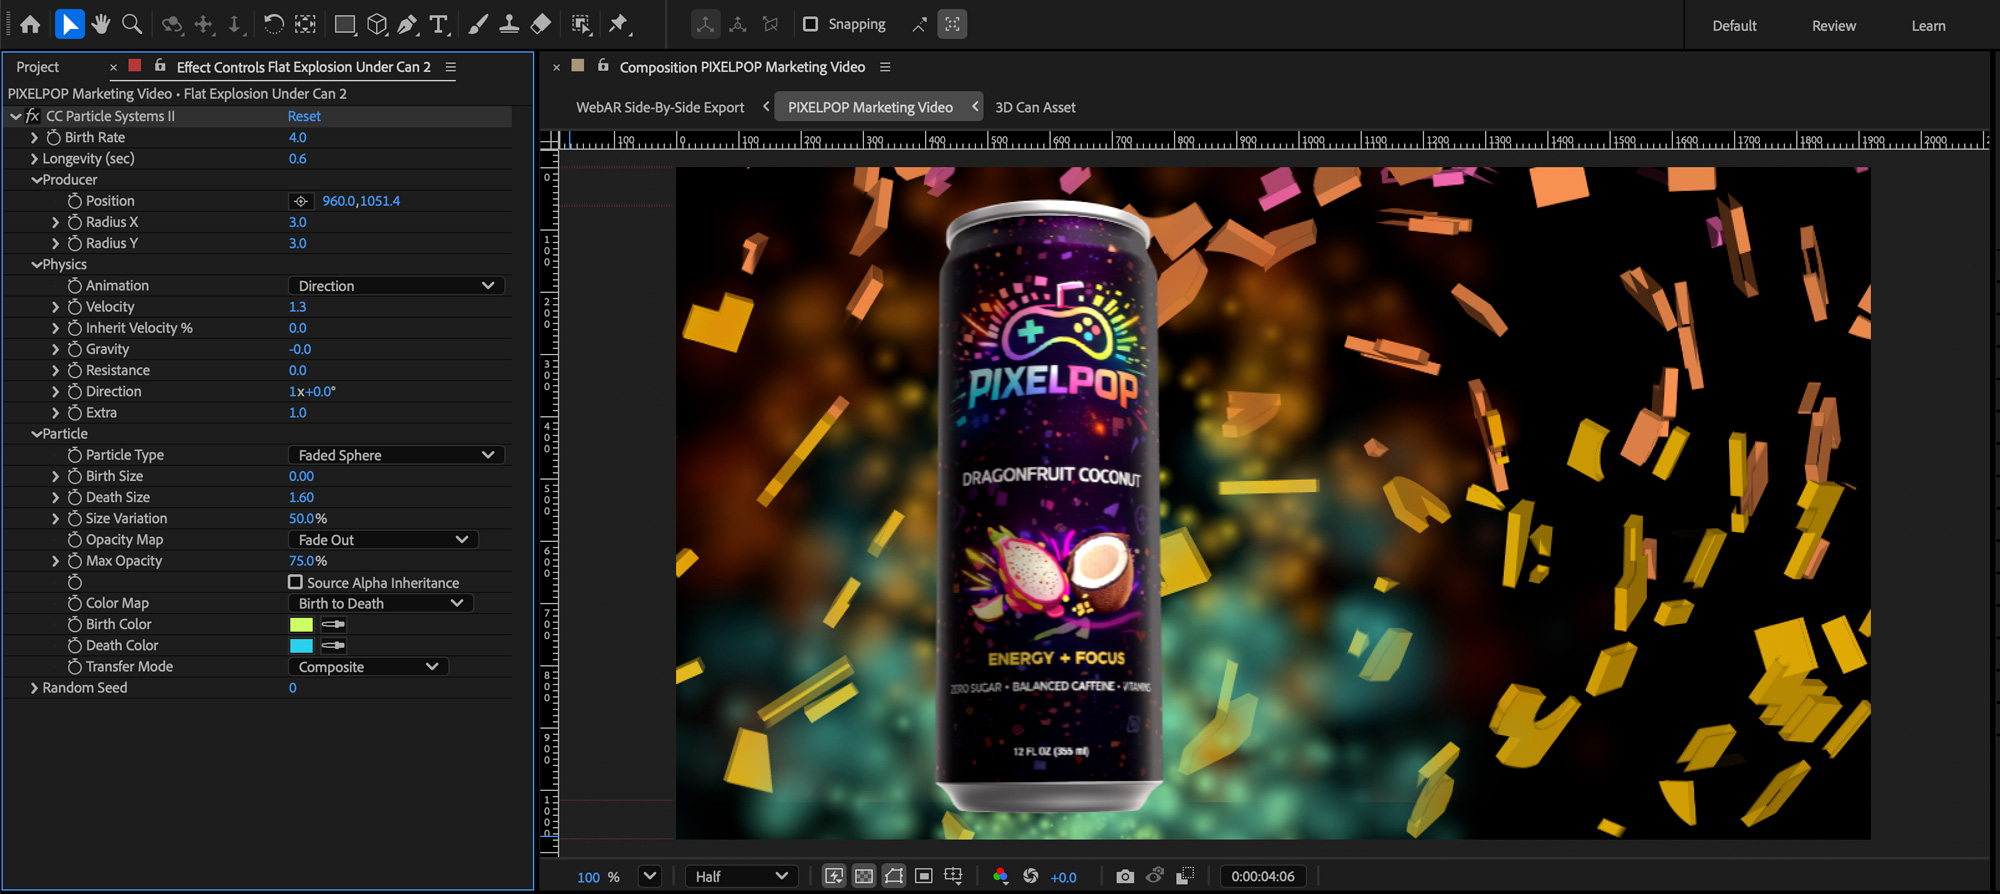
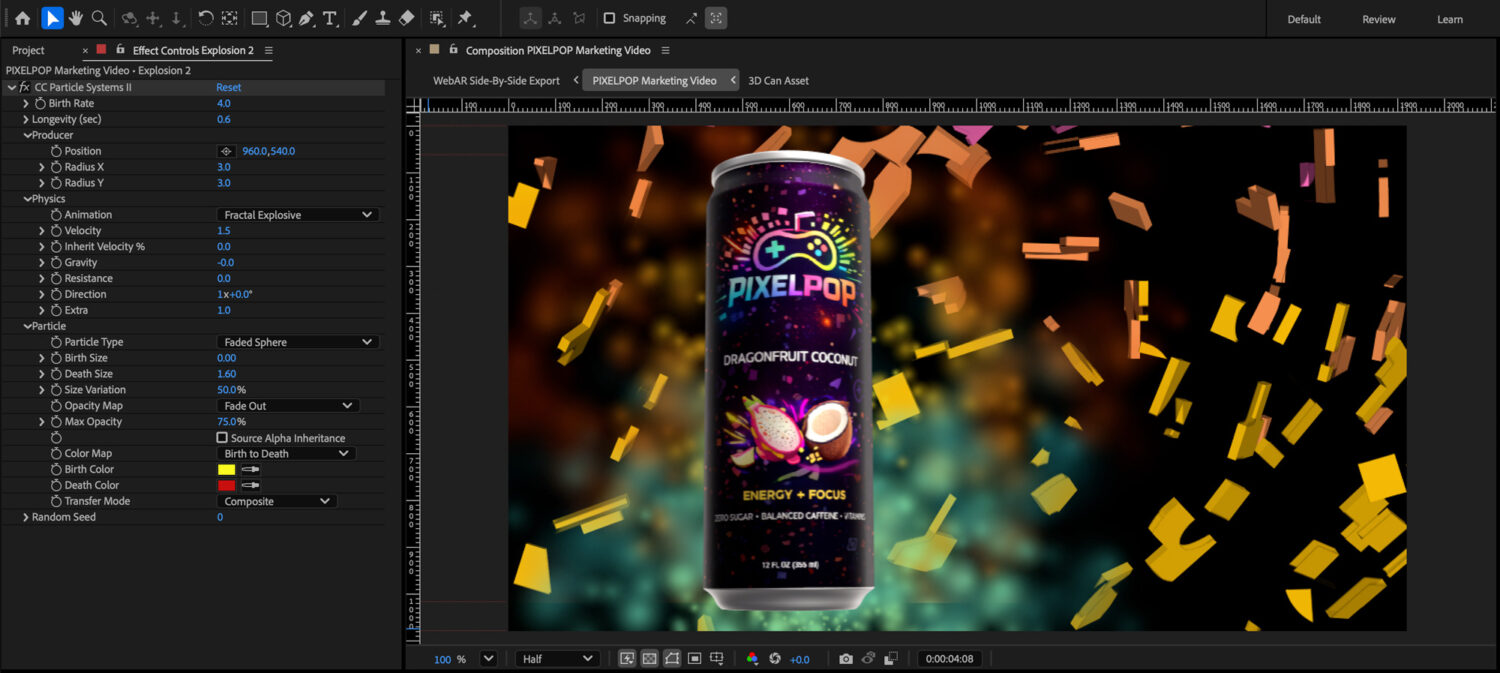
Apply the Effect as a Layer
- In After Effects Layer > New > Solid (1920×1080, make it black)
- Select your new solid layer and select Effect > Simulation > CC Particle System II
- Go to Window > Effects Controls and apply the settings in the video below or from the screen capture below the video on this page.
Activate the Explosion Layer in the Timeline
- Expand the explosion layer to show the Transform controls
- Set your Current Time Indicator on the Timeline
- Click the stopwatch in the Opacity layer to set the first keyframe in your Timeline
- Set the Opacity to 0%
- Move the Current Time Indicator ahead on the Timeline and set your second keyframe
- Set your Opacity to 100%
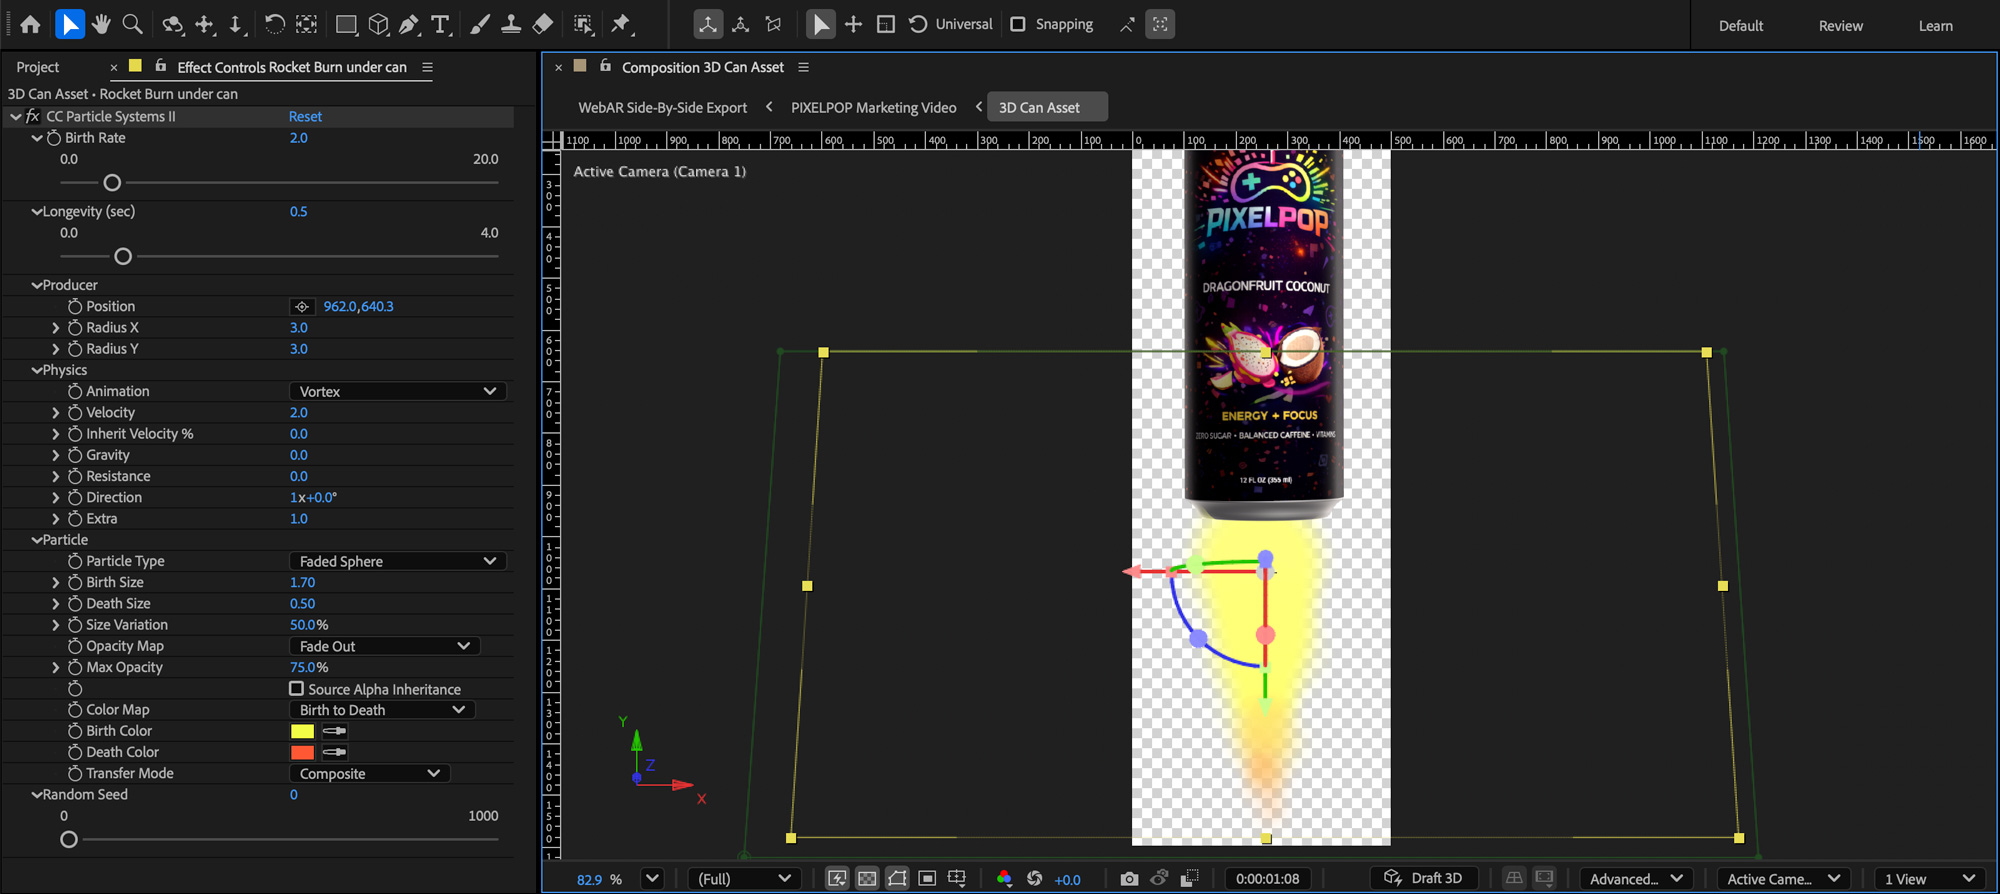
Rocket Afterburner with CC Particle System II
- In After Effects Layer > New > Solid (1920×1080, make it black)
- Select your new solid layer in the timeline and select Effect > Simulation > CC Particle System II
- Go to Window > Effects Controls and apply the settings in the video below or from the screen capture below the video on this page.
Transparent Backgrounds for AR (Augmented Reality) Use
To make a background removable in AR or compositing, make sure your video exports with an Alpha Channel (transparency). If you render a standard MP4, your background will be baked in (usually as black), and you won’t be able to “remove” it later.
I’d suggest designing areas in your video that look cool when they’re transparent, as an augmented reality experience. It doesn’t have to be a lot, just enough to grab the viewer’s attention and maybe get a “Wow!” I’d also suggest choosing text and element colors that look good and stay legible on both dark and light backgrounds. You never know where a customer will play your video in augmented reality.
Toggle Transparency Grid
Making your background transparent is fairly easy in After Effects:
- Click the small checkerboard icon at the bottom of the Composition window. If you see checkers, your background is transparent.
- If you still see solid black or a color, you might have a Solid layer acting as a background—hide or delete it before exporting for AR.