
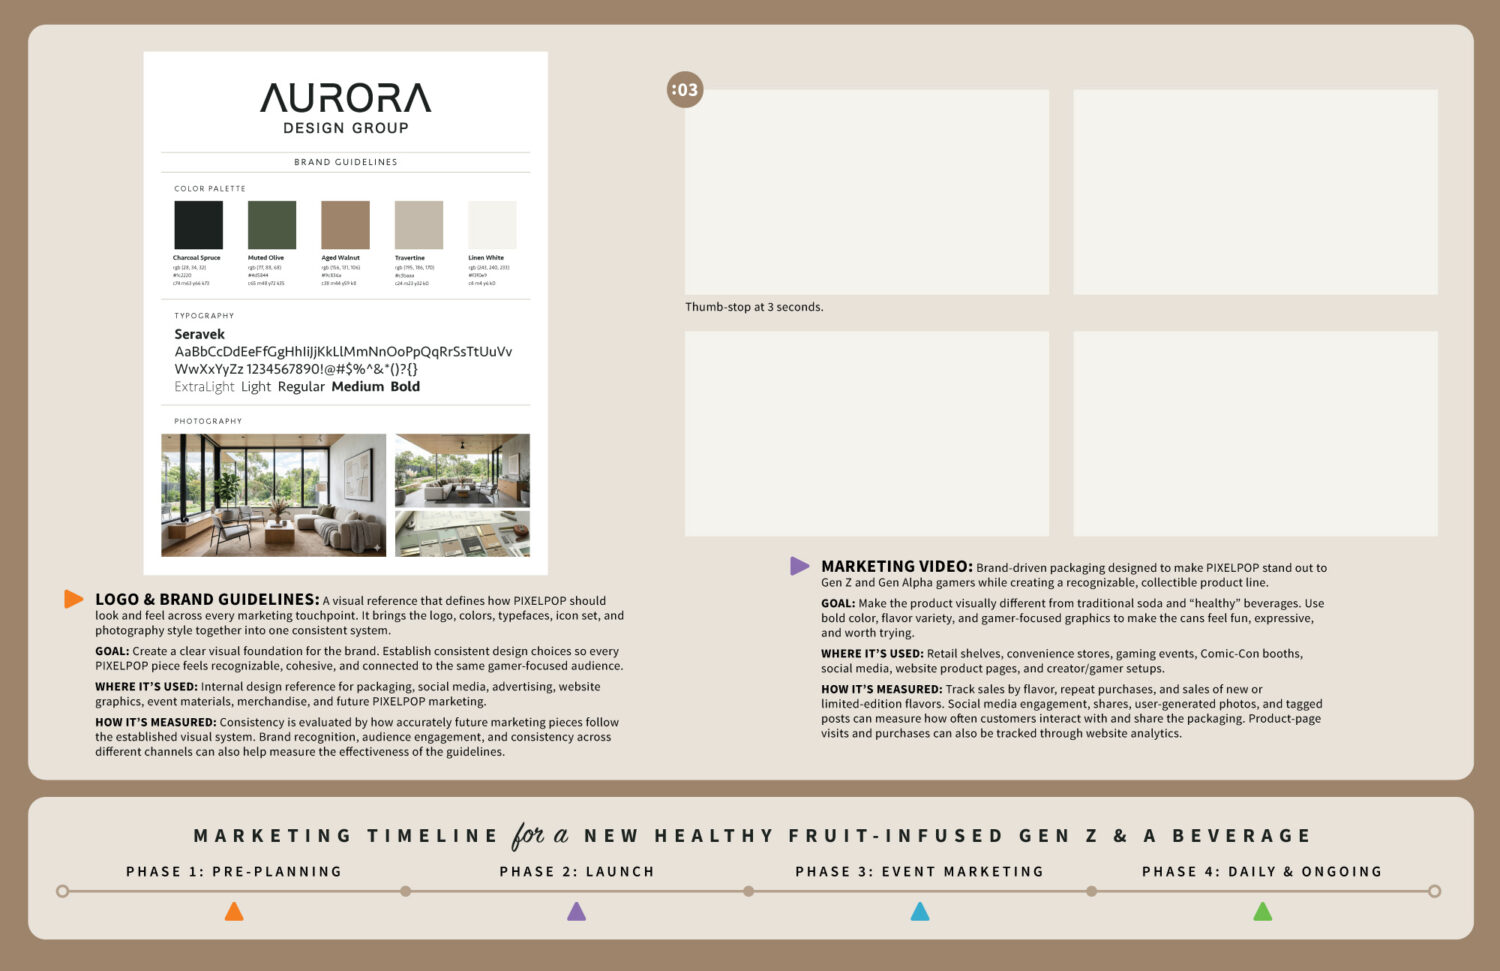
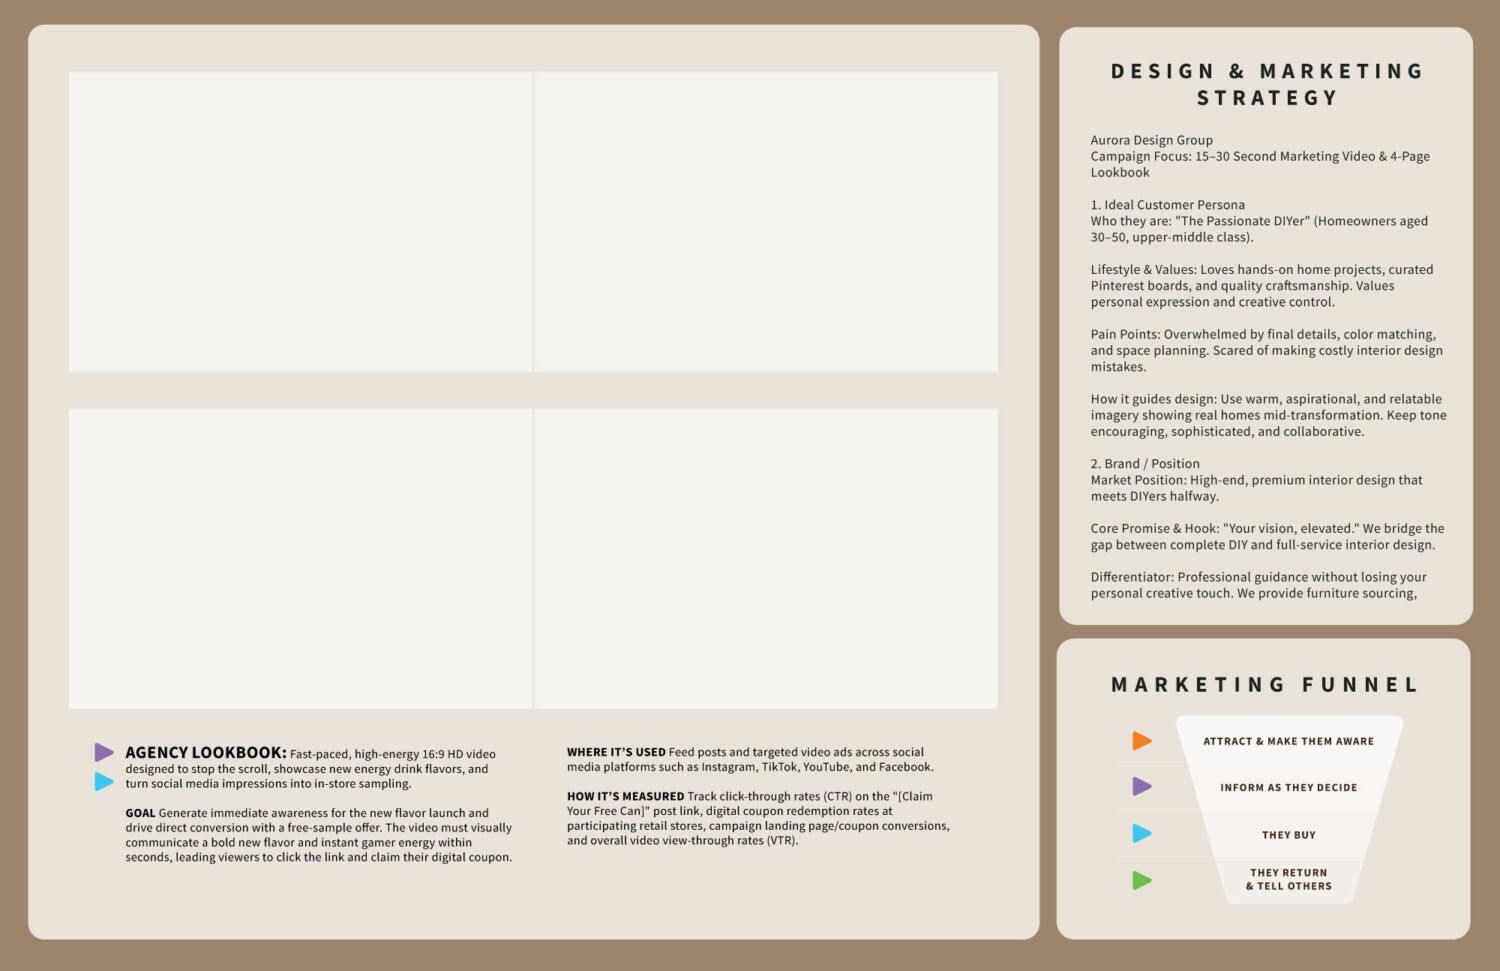
Remember, the goal of this course is to make a 2-page portfolio spread of your marketing campaign for an interior design agency: Aurora Design Group.
Like this:
Here’s my step-by-step workflow:
1. Write your Design & Marketing Strategy
This will help define your message, audience, and goals.
2. Define where your marketing material will be used
Where will customers/viewers engage with it? Where will it be used? TikTok, Instagram, YouTube, your website? Will it be viewed on a phone, tablet, website?
This will guide the size and format you shoot your video and photo assets in.
3. Create your storyboard, script, and shot list sheet
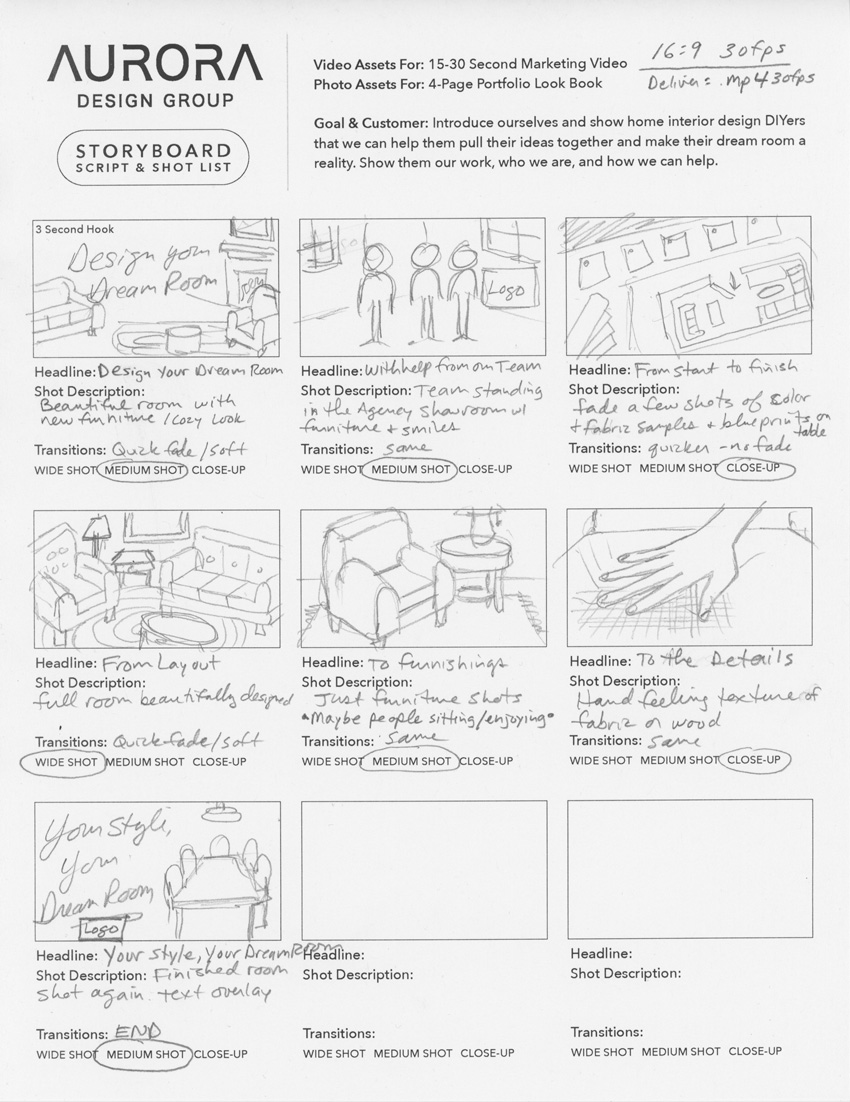
This sheet contains a lot of valuable and clarifying information:
- Your marketing campaign’s goal and direction.
- Script and/or Copywriting
- Storyboard or Thumbnail sketches
- Shot list (what video and/or photos do you need?)
- Style and settings for the shoots (outdoors, indoors, natural light through a window, no windows, just overhead fluorescent lights, candid live shots, staged actor portrayals?)
4. Shoot your videos and photos
Practice patience and adaptability. Light might change: weather, actors, etc. How “creative” do you get with your shots? Think back to your message and audience and your Design & Marketing Strategy.
5. Finalize assets
Edit on a desktop with Lightroom for photos and Premiere Pro for videos.
Using a structured workflow makes sure basic smartphone video and photos look cohesive, high-end, and ready for marketing collateral—from social media feeds to website banners and printed promotional flyers.
Detailed Photo Workflow
1. Pre-Production & Shot List Planning: Establish specs & visual direction before shooting.
- Define Asset Deliverables: Identify where the images will live—website headers (16:9 horizontal), social feeds (4:5 vertical or 1:1 square), or printed materials (high-resolution print).
- Build a Modular Shot List: Group your photos into three core buckets:
- Hero Product Shots: Clean, isolated shots of products or services on neutral backgrounds.
- Lifestyle/In-Use Shots: Contextual imagery showing people interacting with the product/service in natural light.
- Environmental/Behind-the-Scenes: Shots of the workspace, storefront, or staff to build brand authenticity.
- Prop & Styling Prep: Gather simple background surfaces (like foam boards, linen, or wooden tabletops) and brand-aligned props that complement the client’s color palette without cluttering the frame.
2. On-Location Capture & Camera Setup: Optimize mid-range smartphone sensor & lighting.
- Camera Settings: Use the native camera app at native maximum resolution. Clean the camera lens with a microfiber cloth before shooting. Avoid digital zoom—always move physically closer or crop later in post.
- Composition & AE/AF Lock: Turn on the 3×3 Grid in settings to align shots using the Rule of Thirds. Tap and hold your main subject to lock focus and exposure. Manually drag the exposure slider down slightly—mid-range sensors tend to overexpose highlights, and shadow detail is much easier to recover than blown-out whites.
- Natural Light & Diffusers: Set up perpendicular to a window for side-lighting, which creates depth and texture. Place an inexpensive white foam board opposite the window as a bounce card to reflect soft light back into dark shadows.
- Camera Stability: Mount the phone on a budget tabletop tripod. Use a 2-second shutter timer or remote trigger to eliminate camera shake when tapping the screen.
3. Mobile Editing & Batch Processing: Post-processing in Lightroom Mobile or Snapseed.
- Global Exposure & White Balance: Import raw photos into Adobe Lightroom Mobile or Snapseed (both free). Correct White Balance first so whites look neutral. Adjust Highlights down (-20 to -40) to preserve detail, and raise Shadows slightly (+10 to +30) to reveal tone.
- Color Tuning (HSL): Use HSL (Hue, Saturation, Luminance) controls to align key tones with client branding (e.g., muting distracting background colors or enhancing primary brand hues).
- Perspective & Aspect Cropping: Straighten vertical and horizontal lines so walls, tables, and product edges look square. Crop directly into your intended aspect ratios (4:5 for Instagram feeds, 16:9 for web headers).
- Batch Styling: Save your edit as a Preset or copy/paste edits across all photos from the shoot to guarantee visual consistency across the entire campaign.
4. Design Integration & Asset Management:File prep for marketing channels and archive.
- Background Removal: For graphic design layouts (ad banners, flyers, or social graphics), import hero shots into desktop design tools or mobile apps (like Photoshop Express or Canva) to create transparent PNG cutouts.
- Export Settings: Export final images as high-quality JPGs. Use full resolution for print assets, and compressed JPGs (around 80-90% quality) for web uploads to maintain page speed.
- Cloud Archiving: Upload organized raw and edited files to cloud storage (Google Drive, Dropbox, or iCloud) using a clear naming convention:
YYYYMM_ClientName_Project_001.jpg(e.g.,202610_MainStBakery_AutumnPromo_01.jpg).
Key Rule of Thumb: Shoot slightly wider than you think you need. Having extra space around your subject gives you the flexibility to crop into vertical, horizontal, or square formats later without cutting off essential details.
Detailed Video Workflow
A streamlined video workflow for small business marketing relies on modular planning, efficient capture, and light post-production. By focusing on clear storytelling and audio quality over expensive camera gear, a single designer can easily produce professional-grade social and web video using only a mid-tier smartphone.
1. Pre-Production & Asset Prep: Prerequisite – complete before picking up the camera.
- Define the Deliverable: Identify the primary platform and orientation—9:16 vertical for Instagram Reels/TikTok/YouTube Shorts, or 16:9 horizontal for website embeds and YouTube. Establish a single core Call to Action (CTA) (e.g., “Visit our showroom” or “Order online”).
- Two-Column Scripting: Outline the video using two columns: A-Roll (the primary talking head, narration, or main interview) and B-Roll (supporting visual footage showing products, location details, or customer interactions).
- Prepare Brand Overlays: Export graphic assets—such as transparent PNG logos, lower-third graphics (for name tags), and end-screen CTAs—from your desktop vector/design tools and save them directly to a dedicated project folder on your phone.
2. Production & Field Capture: Hardware optimization for mid-range sensors.
- Camera Settings: Open the native phone camera app and select 1080p or 4K at 30 fps. Clean the lens with a microfiber cloth before every shoot.
- AE/AF Lock: Tap and hold your subject on screen to lock Auto-Exposure and Auto-Focus. Mid-range phone sensors frequently shift exposure automatically under mixed indoor lighting; locking focus prevents distracting brightness fluctuations.
- Lighting & Audio Setup: Position your subject facing a large natural light source (a window) or an affordable LED panel. Plug an inexpensive wireless lapel mic directly into your phone—crisp, clear audio matters far more to audience retention than camera resolution.
- B-Roll Capture: Mount the phone on a budget tripod for static A-roll. For B-roll, capture three quick angles for every scene: a wide shot (context), a medium shot (action), and a tight detail shot (texture/product closeup).
3. Post-Production & Desktop or Mobile Editing: Est. time: 20-30 minutes per video.
- Timeline Assembly: Import your footage into a mobile video editing app like VN Editor (free, no watermark), CapCut, or Adobe Premiere Mobile. Assemble your main A-roll first, cutting out pauses and filler words to keep the pacing brisk.
- Layer B-Roll & Brand Graphics: Place B-roll clips on the upper video track over the main narration to hide cuts and keep the video visually dynamic. Import your pre-made lower-third PNGs and brand overlays onto top tracks where appropriate.
- Audio Clean-up & Captions: Use built-in noise reduction (like “Enhance Audio”) to eliminate room echo. Run the auto-caption tool to generate dynamic closed captions; most viewers watch mobile feeds without sound, making captions mandatory.
- Color & Tone: Apply a subtle color preset or adjust exposure slightly to ensure all clips share a cohesive, branded color balance.
4. Export & Multi-Platform Distribution: Final QA and channel handoff.
- Export Settings: Export the video in 1080p MP4 at 30 fps. This resolution ensures maximum visual sharpness without triggering aggressive compression algorithms when uploaded to social feeds.
- Modular Re-framing: Duplicate the finished timeline within your mobile app to quickly re-crop or re-orient content for secondary channels (e.g., adapting a 9:16 vertical Reel into a 1:1 post).
- Publishing & File Storage: Upload natively to each platform rather than cross-posting links. Archive raw clips, exported videos, and graphic assets in an organized cloud storage directory (Google Drive, iCloud, or Dropbox) categorized by client name and month.
Key Rule of Thumb: Design for scrollytelling. The first 3 seconds must introduce the hook visually or textually before viewers swipe past.
Design your marketing material
Begin with your Design & Marketing Strategy and brand guidelines. Then design your Marketing video in Premiere Pro and your Lookbook in InDesign.
Prepare/export and deliver your deliverables
Nice work!