
This workflow tutorial shows you how to play your After Effects 3D animation in an AR (Augmented Reality) real-world environment through your phone’s camera.
The Process We’ll Follow
- Prepare and export your marketing video from After Effects for import into an AR workflow
- Build an AR scene in an online web-based AR Experience builder
- Generate a QR code to launch the AR experience
This is done inside the AR Experience builder (Kivicube.com) - Pair it with your event flyer
Along with the QR code, this printed piece will act as your camera’s target to launch the video in AR and play it transparently above the printed flyer—in thin air.
Prep your AE video to upload to Kivicube’s AR Workflow
Note: the white rectangle in the screen capture below shows your full video on the left and right, but the layers on the right have been converted to solid white with the “Shift Channels” effect. This effect can’t be seen against a white background, but trust the process, and it will work in our AR Augmented Reality experience.
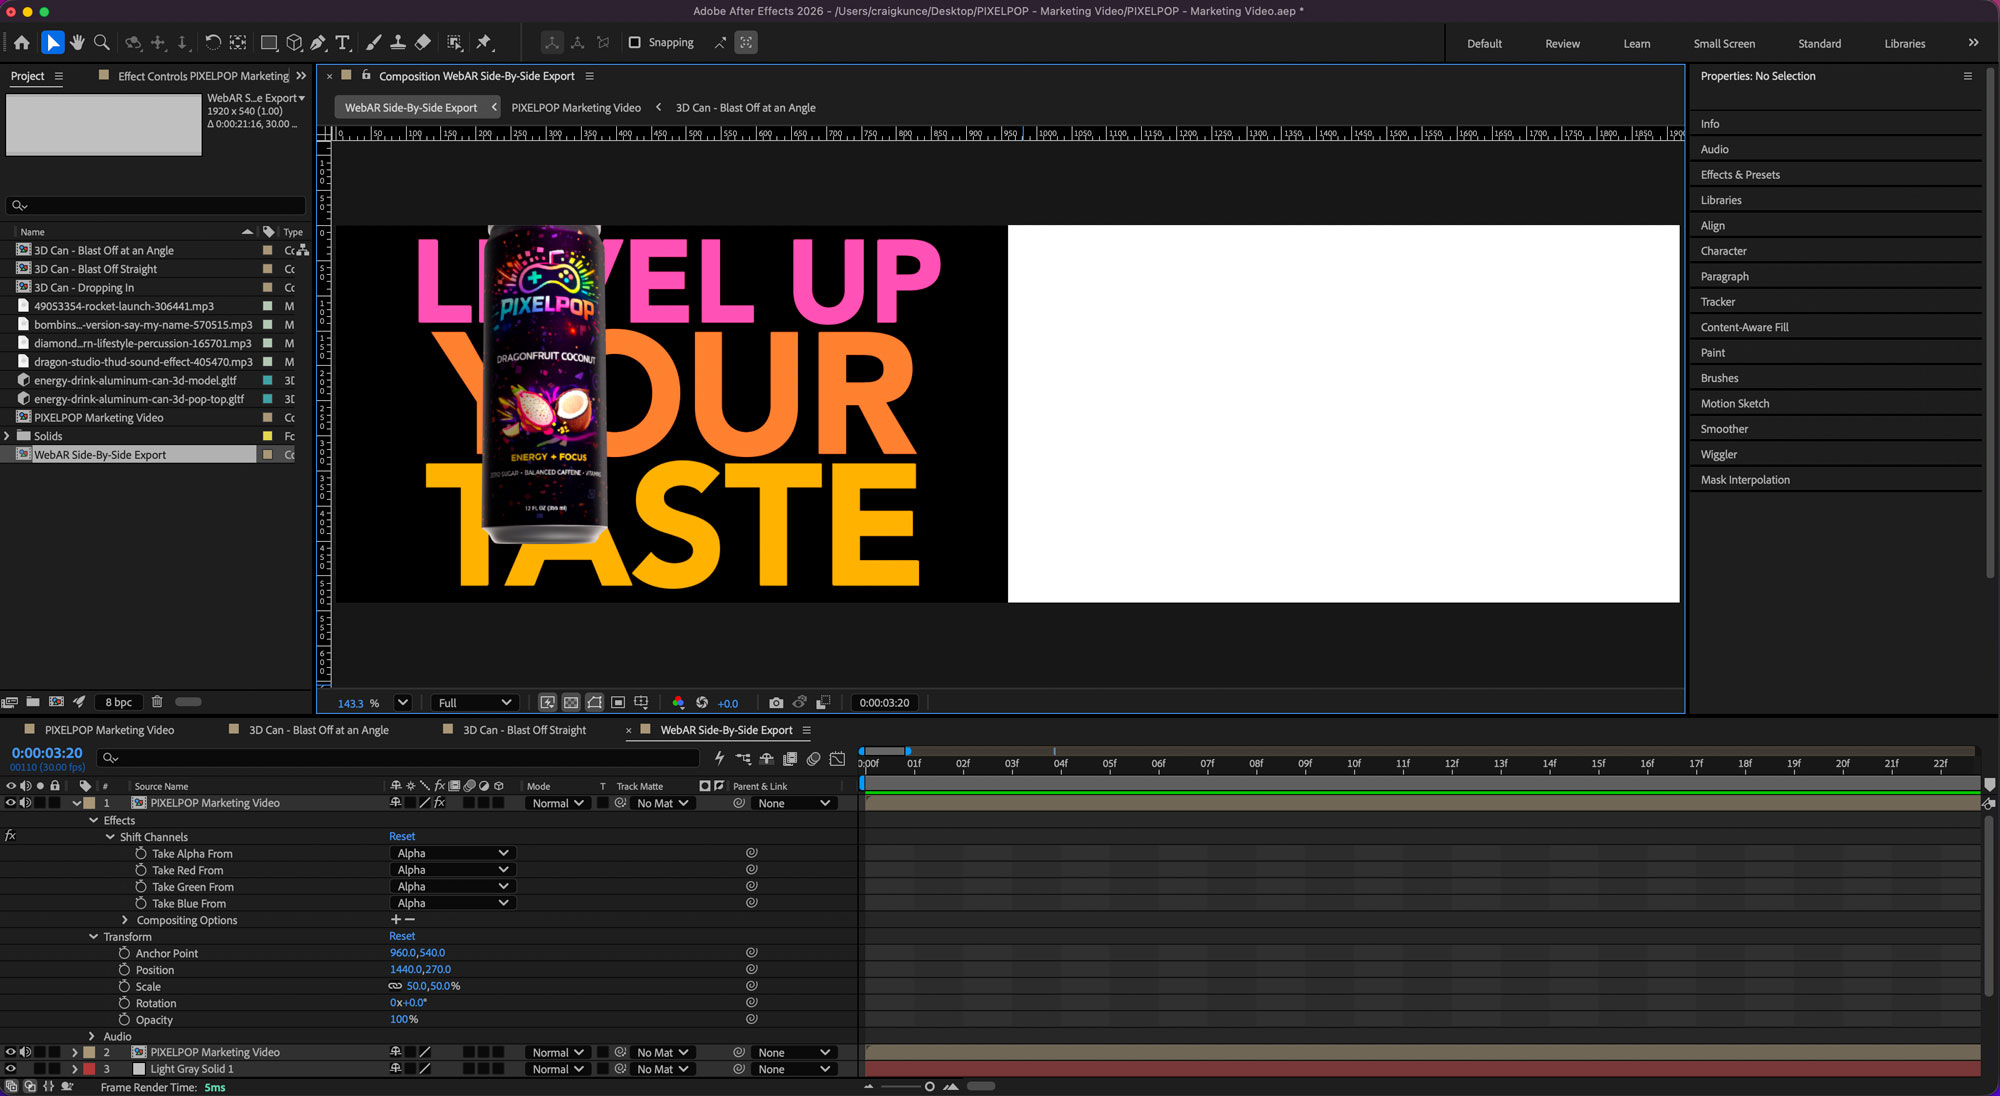
To fit within Kivicube’s 1920px total width limit while keeping a standard 16:9 aspect ratio for your actual video content, your composite layout needs to be 1920 x 540.
Create the Augmented Reality (AR) Side-by-Side Composition in After Effects
- Set Up the Augmented Reality (AR) Side-by-Side Composition:
- Create a new composition in After Effects set to 1920 x 540 pixels (30 fps).
- Resize and Place the RGB Color Stream (Left Side):
- Drag your original 1920 x 1080 animation composition into this master timeline.
- Scale the layer down to 50% so its dimensions become 960 x 540.
- Expand the layer in the timeline
- Transform > Scale: 50%, 50%
- Position the video all the way to the left
- Expand the layer in the timeline
- Transform > Position: 480, 270
- Create the Alpha Mask Stream (Right Side):
- Duplicate your movie layer (the one on the left).
- Move the duplicate video all the way to the right
- Expand the layer in the timeline
- Transform > Position: 1440, 270
- Apply a Shift Channels effect to force the graphic elements to solid white over the white background layer.
- Make sure your original video background is transparent. You should see the gray-and-white checkerboard when you hover over the Toggle Transparency Grid small square (at the bottom left of the Composition window).
- Select your second video’s layer. Go to Effect (dropdown menu at top of screen) > Channel > Shift Channels
- This applies the effect to your second video
- Expand the second video’s layer controls in the timeline. Set the dropdowns in the Effect Controls panel to:
- Take Alpha From: Alpha
- Take Red From: Alpha
- Take Green From: Alpha
- Take Blue From: Alpha
- This instantly turns every colored pixel of your animation into pure solid white.
- Export to MP4:
- Send to Media Encoder and render as an H.264 MP4 at 1920 x 540.
Why This Works Well for WebAR
Downscaling the video streams to 960 x 540 each keeps the file size lightweight—often under 10–15 MB—which speeds up loading times over mobile data while staying under Kivicube’s 1920px canvas constraint and 30 MB free file limit.
When uploaded as a Transparent Video asset, Kivicube splits the 1920 x 540 file into two 960 x 540 halves, maps the right half as the alpha mask, and renders the original 16:9 artwork smoothly on mobile screens.
Understanding the AR Funnel & Measurement Strategy
The sheer novelty and “cool factor” of seeing a transparent video float over a physical flyer in thin air is a powerful emotional hook. For an audience like gamers and Comic-Con-goers, tech-driven novelty builds instant brand equity and loyalty.
However, to move them through the funnel from impressed viewer to actual product sampler, the AR experience acts as a bridge:
- Top of Funnel (Awareness & Curiosity):
- The Trigger: The custom die-cut flyer and QR code catch their eye.
- Metric: QR Scan Rate (Total Scans vs. Total Flyers Distributed).
- Middle of Funnel (Engagement & Brand Affinity):
- The Experience: The WebAR launches in their browser via KiviCube. The transparent video pops off the page, showing the dynamic product launch in spatial 3D.
- Metrics: Session Duration (How long do they watch?) and AR Video Completion Rate (Do they let the 15-second spot play through?).
- Bottom of Funnel (Conversion / Action):
- The Reward: After watching the video, they bring the flyer with the free-product coupon to the show booth to redeem a free sample. Booth employees collect the free-sample coupon, which they scan later to count redemption totals.
- Metric: AR-to-Booth Conversion Rate (How many users who scanned the WebAR actually redeemed the barcode coupon at your booth). Also, how many free-product redemptions were there compared to the number of flyers handed out at the live show? Was it worth the cost to print the flyers (ROI – Return on Investment)
By adding the AR experience video and the free-sample coupon to the flyer, you turn an entertaining gimmick into a trackable foot-traffic engine for your booth.
Finish and Launch your WebAR Experience
With your side-by-side MP4 video prepped for AR, next, let’s upload it to Kivicube.com and use its workflow to create your web-based augmented reality (WebAR) experience.
- Create a free account on Kivicube.com.
- Click: New Scene > Image AR
- Name your scene
- Choose: Web
- Upload your Target Image (PNG, RGB, 1200 x 1200 Pixels) (I just centered my Target Image in the square)
- Click: Create Now
- Click: + Upload Assets
- Upload your WebAR side-by-side video we made and exported in After Effects
- Position your video where you want it to play in relation to your Target Image
- Adjust the settings in the right column to match the screen capture below.
- Click: Share
- Complete the information requested (see screen capture below)
- I made a Web Thumbnail (640 x 640) (this is optional, but I would consider it)
- To get the QR Code and add it to your Target Image, I zoomed in on my browser window (Command +) and took a screenshot (Command Shift 4). Then I put it on my Target Image for customers/viewers to scan. Note: The Target Image uploaded earlier does not need the QR Code to work.
- Click: Publish
- Lastly, I added the QR Code to my flyer (Target Image), printed it, and tested it with my phone.
Image for steps 5–11
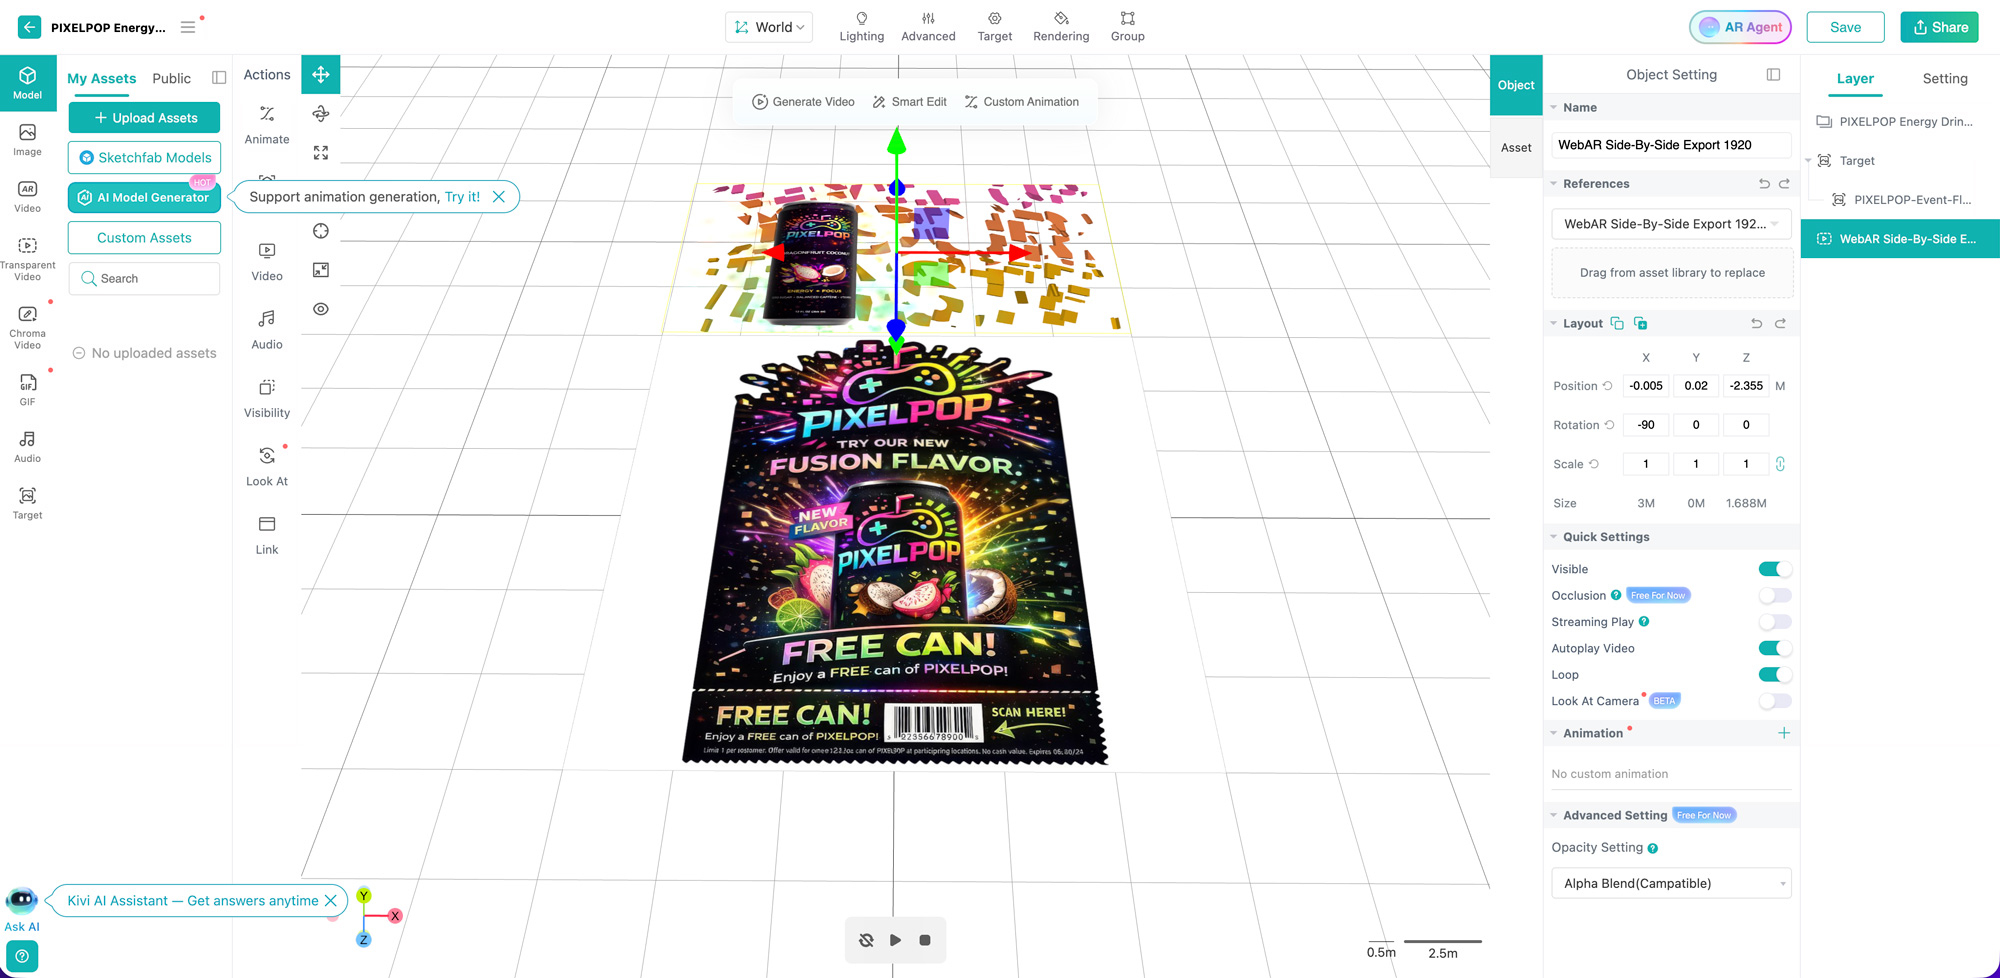
Image for steps 12 & 13
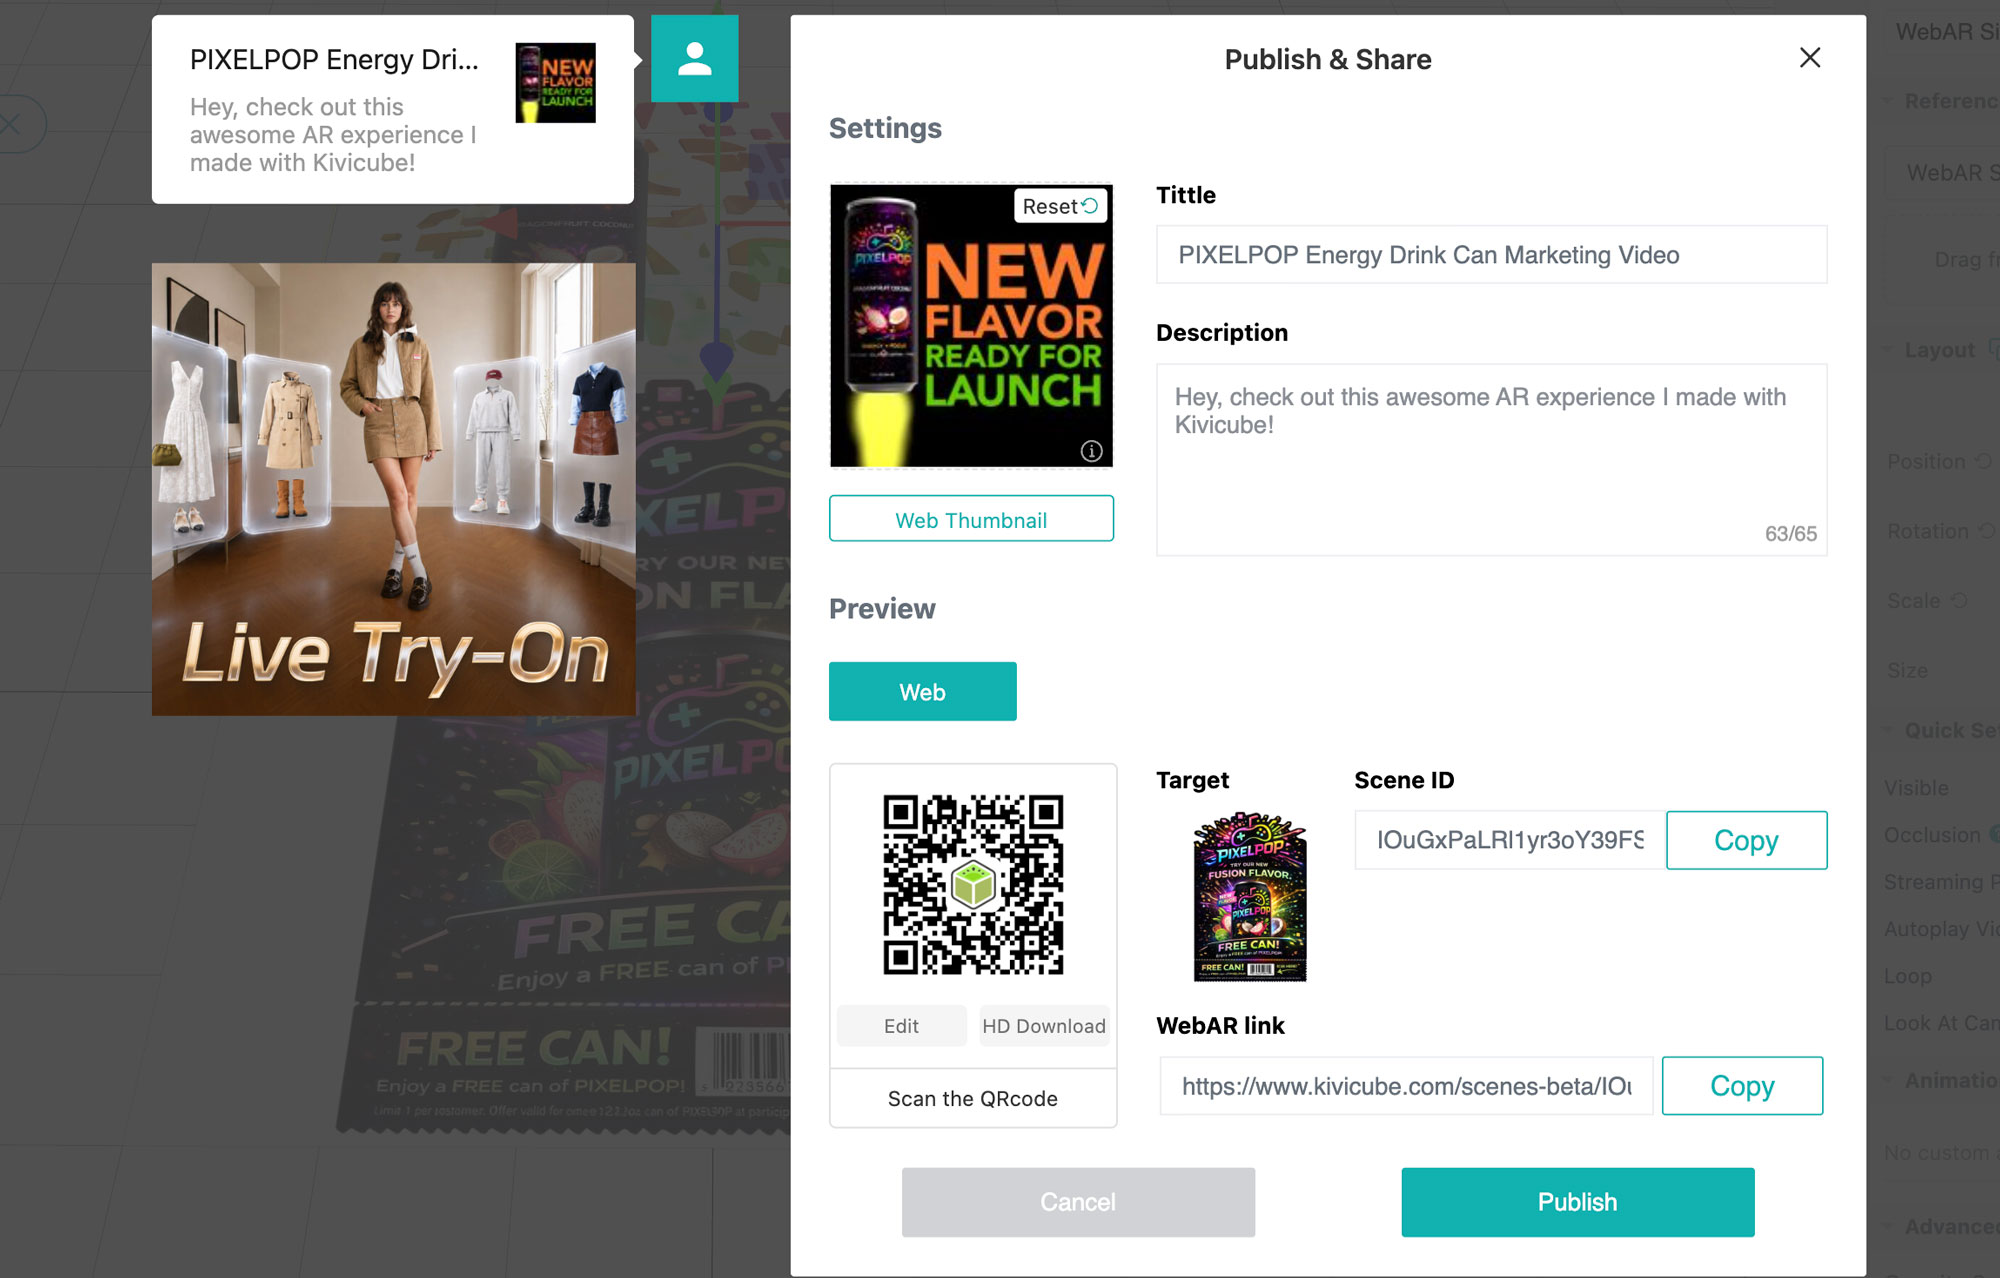
Image for steps 14 and 15