
Color Correction & Grading in Adobe Camera Raw
This guide walks you through a professional, non-destructive image workflow in Adobe Photoshop using Camera Raw as a Smart Object. This approach keeps your original photo intact, so you can return and refine your edits anytime.
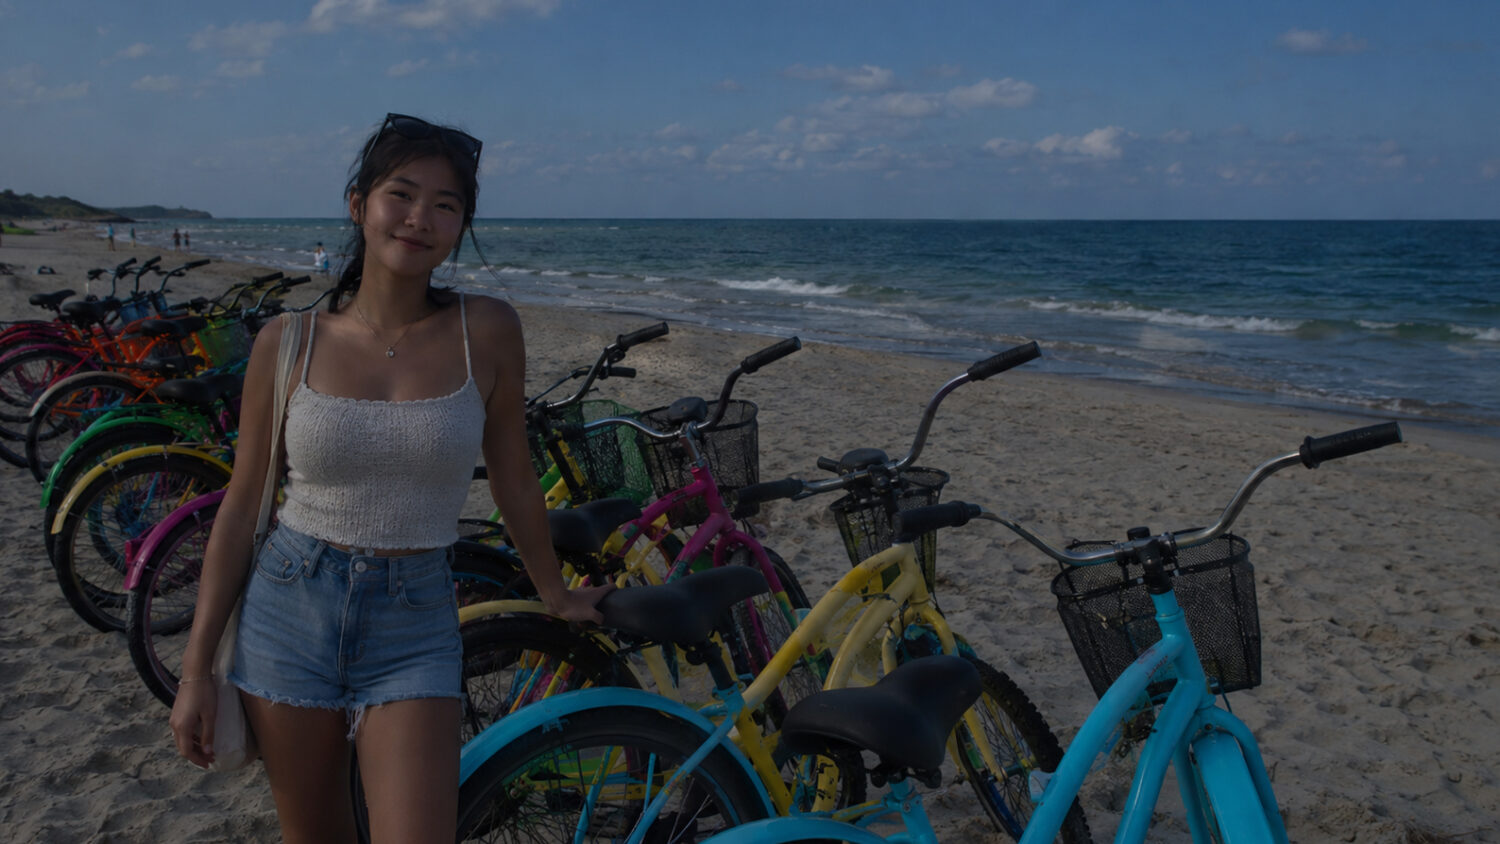
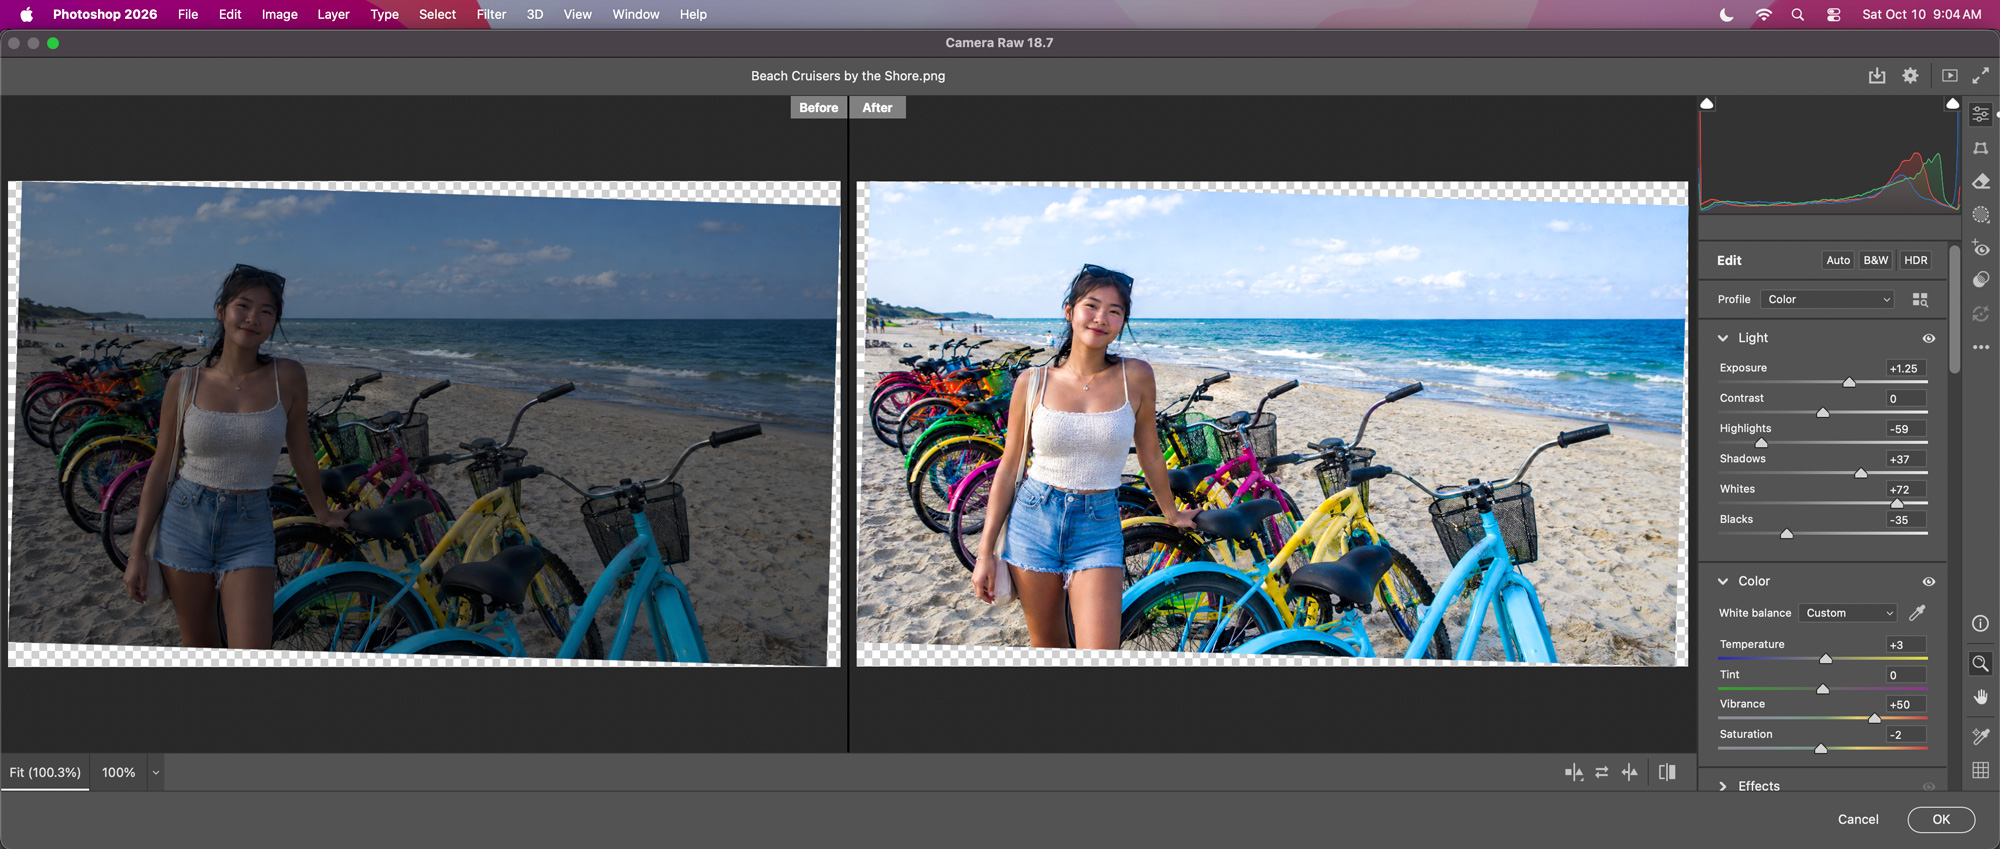
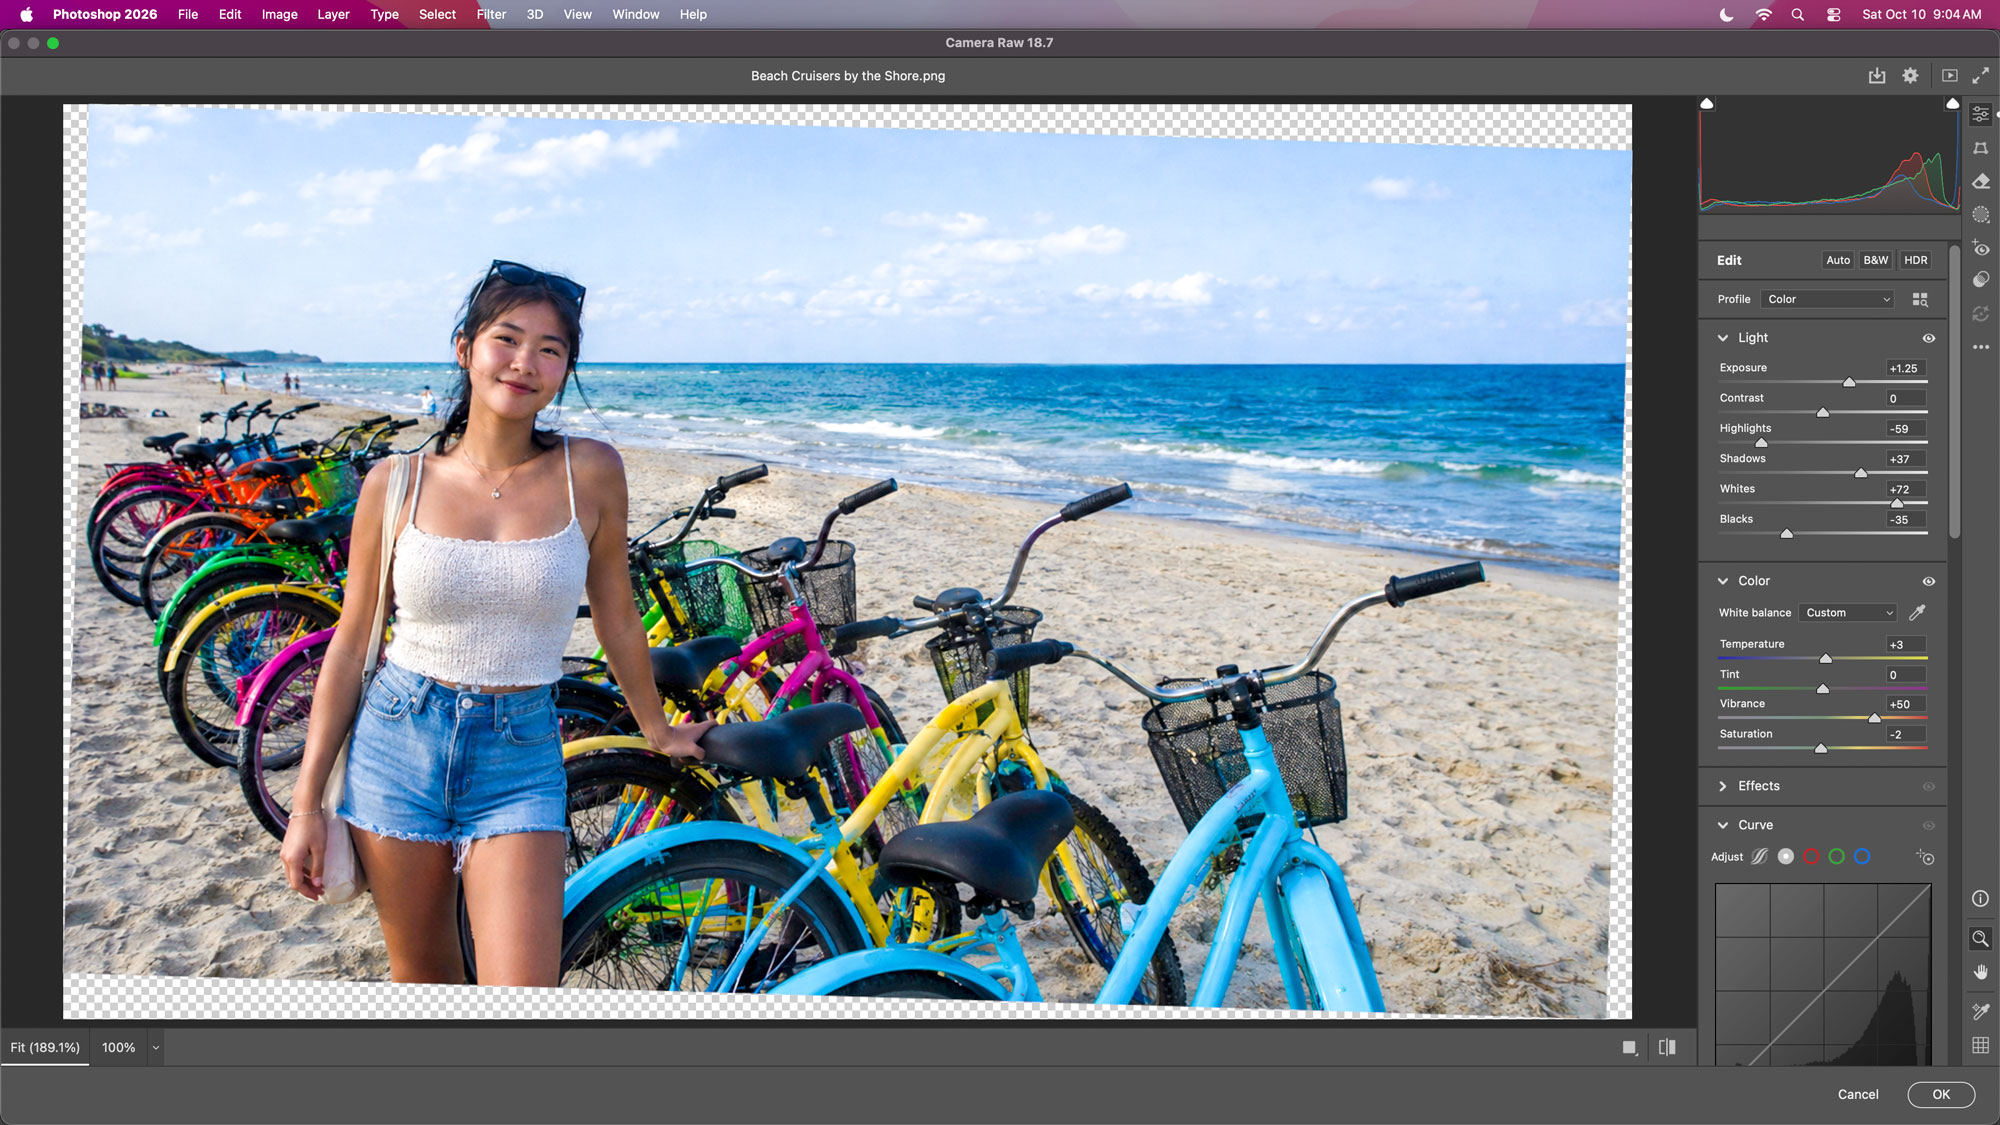
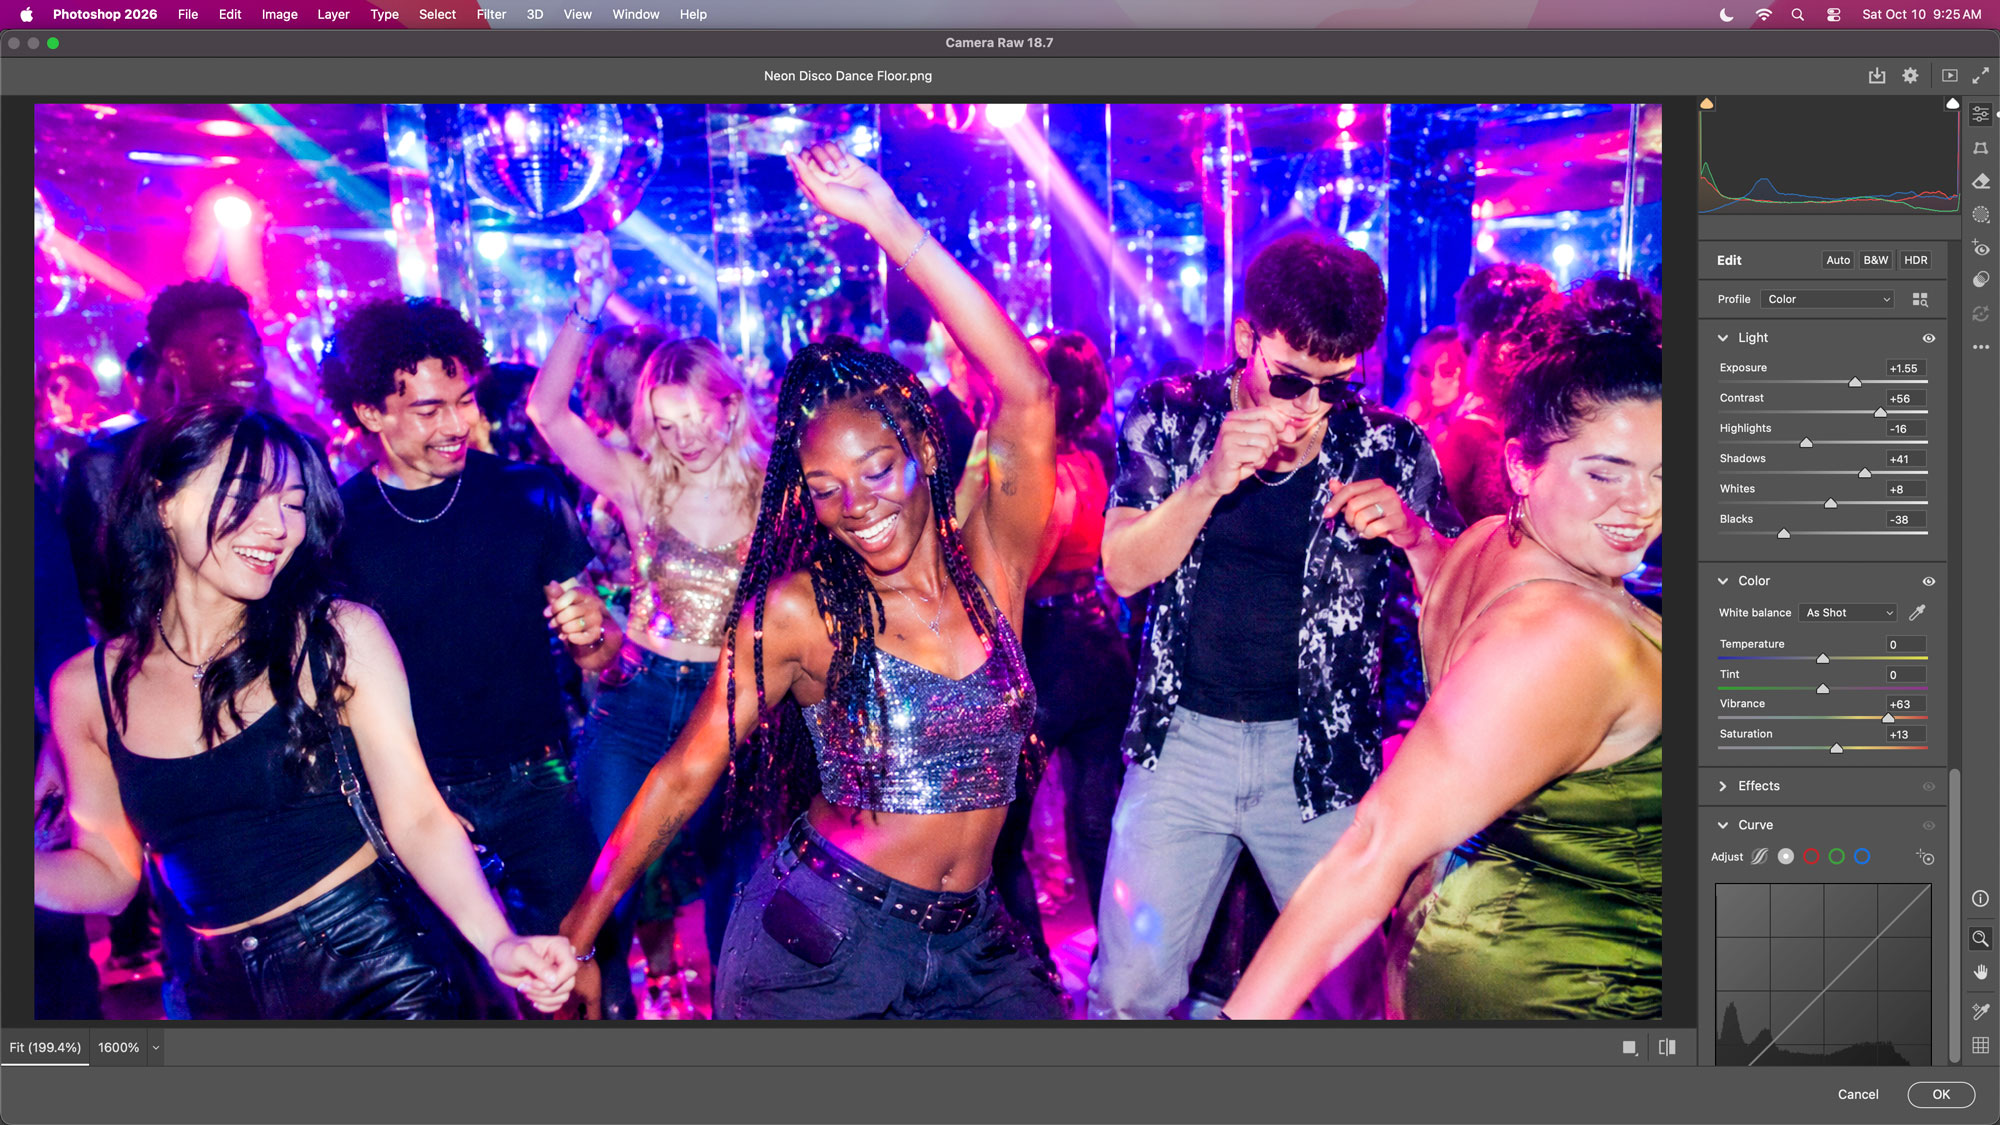
Download this poorly shot photo and try Camera Raw for yourself. See my settings below for Camera Raw.

Another Example to Try

Phase 1: Setup & Non-Destructive Workflow
Step 1: Open Your Image in Photoshop
- Launch Photoshop and open your JPEG photo. (File > Open).
Step 2: Convert Layer to a Smart Object
- Right-click the image layer in the Layers Panel and select Convert to Smart Object.
- Why this matters: Converting to a Smart Object makes sure the Camera Raw adjustments are applied non-destructively and leaves your original photo layer intact and untouched.
Step 3: Launch Camera Raw
- Go to Filter > Camera Raw Filter…
Phase 2: Technical Color Correction (Basic Panel)
Work through the Basic panel from top to bottom. The goal here is clean, balanced lighting and natural color representation before applying creative styling.
Step 4: Execute Tonal & Color Adjustments
- Try Auto Mode First: Click Auto at the top of the Basic panel. If it delivers a balanced exposure and clean neutral tones, use it as your baseline. If not, click Reset or adjust manually using the steps below.
- Set White Balance: Adjust Temperature (cool/warm) and Tint (green/magenta) until neutral whites and gray tones appear natural and skin tones look realistic.
- Set Overall Contrast: Tweak Contrast to balance flat lighting or tone down overly harsh light.
- Recover Highlights & Shadows:
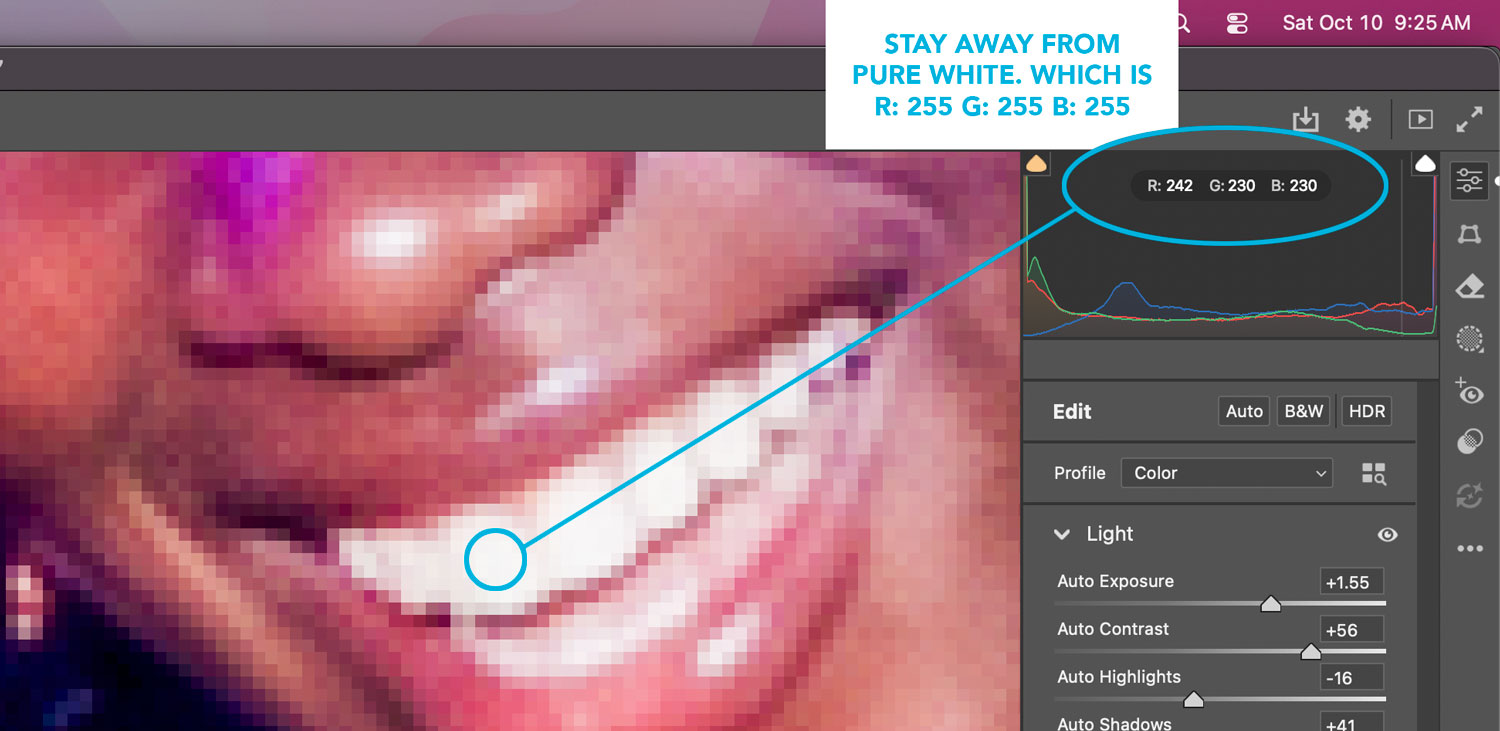
- Pull back Highlights to restore lost detail in bright areas (sky, bright fabric, reflections).
- Lift Shadows to reveal hidden detail in dark regions without introducing noise.
- Adjust Saturation & Vibrance:
- Increase Vibrance first to boost muted colors while protecting skin tones.
- Fine-tune Saturation sparingly to avoid over-saturating the entire frame.
- Apply Sharpening (Detail Panel): Open the Detail panel to add crispness. Hold
Alt(Windows) /Option(Mac) while dragging the Masking slider to restrict sharpening strictly to key edges rather than flat background textures.
Pro Habit (The Toggle Check): Press the
Pkey regularly while working to flip between your original image and your current edits. If the “Before” state looks more natural or punchier than your adjustments, dial back your sliders.
Phase 3: Creative Color Grading (Brand & Vibe)
Once your photo is color corrected, use the Color Grading panel to establish mood, vibe, brand personality, and visual storytelling.
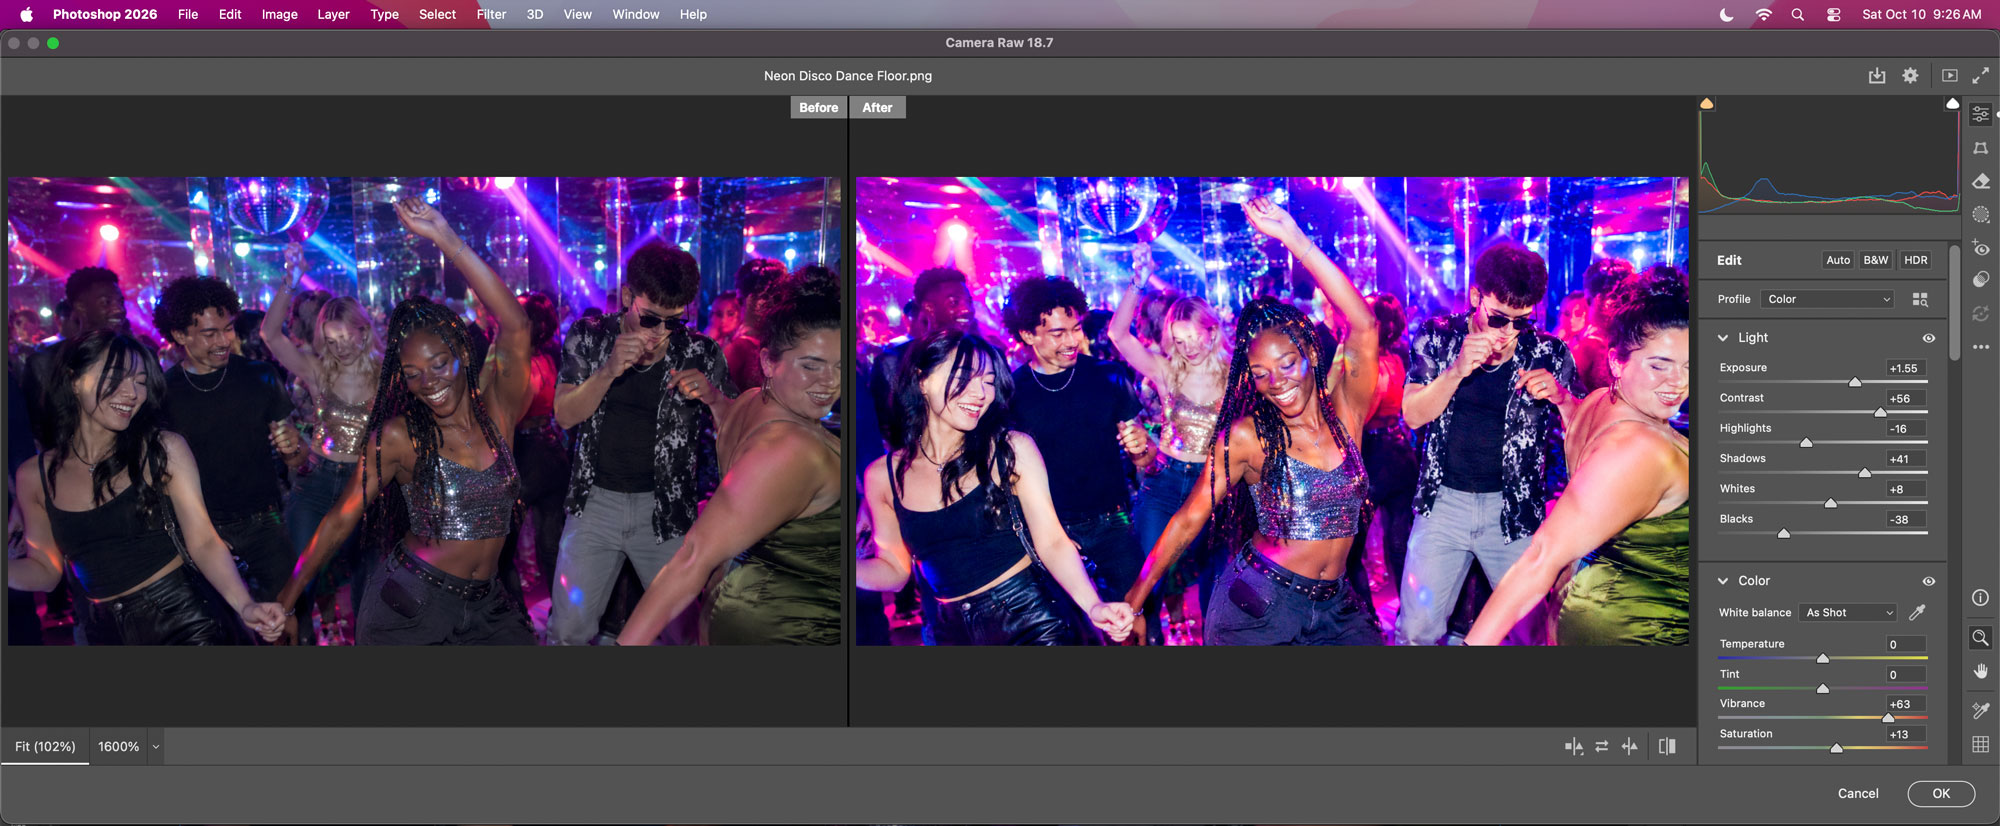
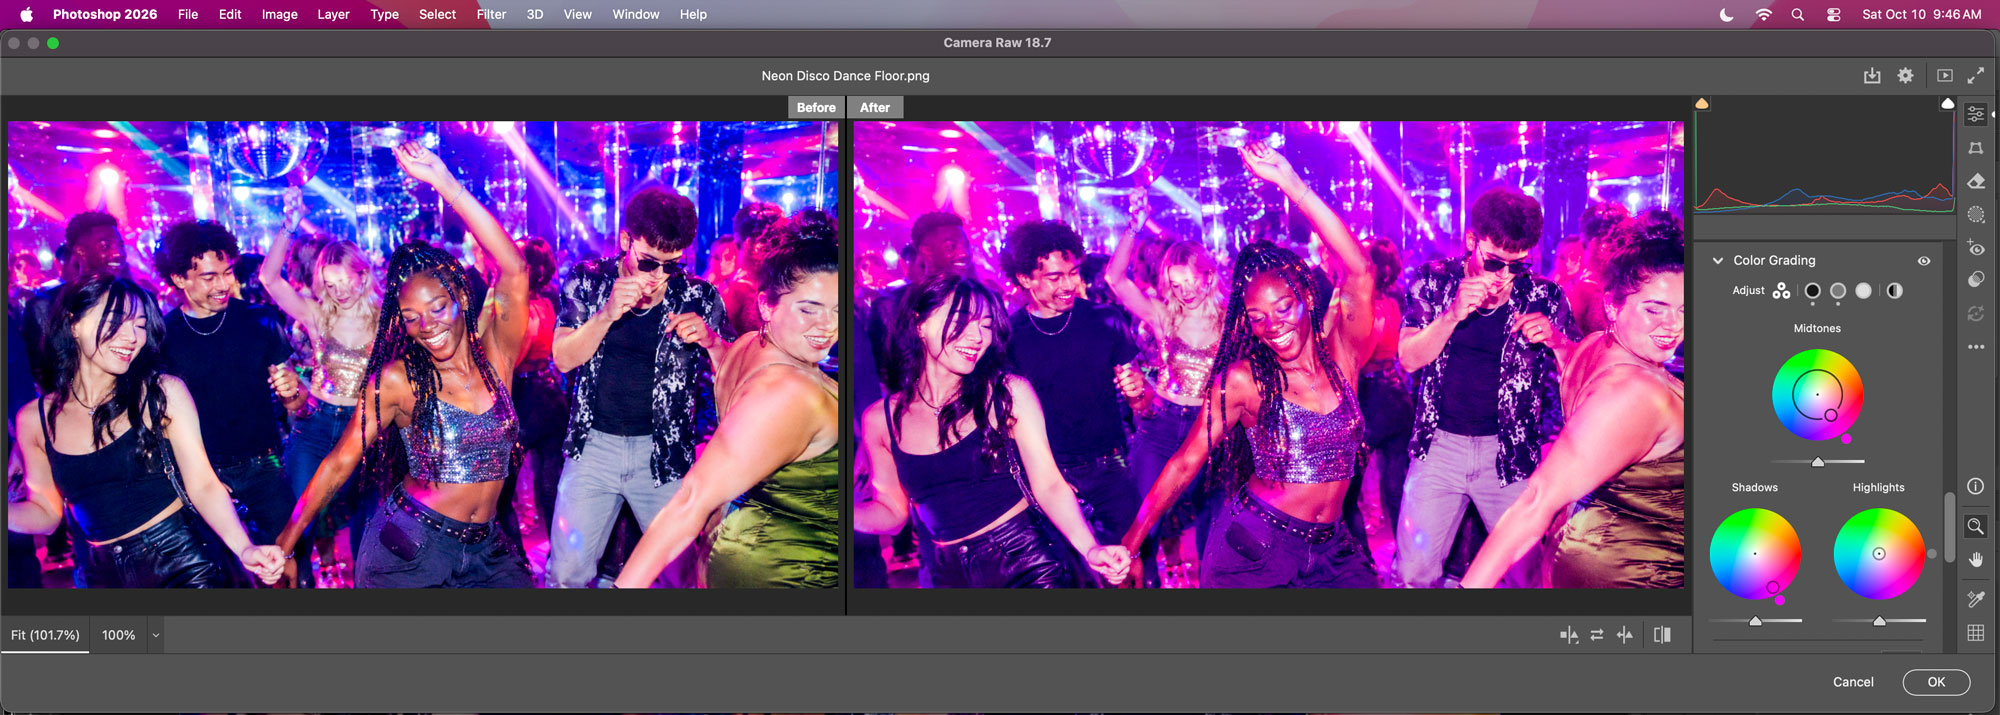
Maybe you’re selling to energetic, early 20-year-olds and want to add a vibrant magenta cast to all your photos. This is where you would do that. Let’s take the dancing club photo and add a magenta cast using the Color Grading wheels in Adobe Camera Raw. Notice how I only moved the midtones and shadows. I felt this kept more depth and contrast intact while still giving me the magenta accent.
Step 5: Grade with Intent Using Color Wheels
Open the Color Grading panel (featuring Midtones, Shadows, and Highlights wheels).
- Apply the Rule of Two: Pick two complementary or harmonious tones to build your story (e.g., warm highlights for approachability combined with cooler shadows for depth and contrast). Avoid tinting every wheel indiscriminately.
- Fine-Tune Blending & Balance:
- Blending: Adjust how smoothly the shadow tint transitions into the midtones and highlights.
- Balance: Shift the slider left or right to dictate whether the overall mood leans toward shadow tones or highlight tones.
Phase 4: Composition & Visual Hierarchy
Step 6: Crop & Frame for Your Target Audience when Designing
After you place the photo in your main design software, such as InDesign, Photoshop, Illustrator, or Canva, try different cropping styles to match and reinforce your message, audience, design style, and marketing strategy, including your call-to-action, visual hierarchy, and overall photo direction.
For example, is your strategy to focus on one single person being able to get away from their job for a stress-reducing vacation? Maybe you should zoom in and crop the dancing photo to just one person enjoying their vacation. This helps people relate to the photo on an individual level.
Or, if your strategy is to market to a group of friends to finally get away for an intimate class reunion, you might want to show two or three women dancing together. Your marketing strategy directs the photo cropping.
- Establish Focus: Crop the frame so the composition directly guides the viewer’s eye to the primary focal point.
- Consider Audience & Marketing Goals:
- Leave clean negative space if the image needs to accommodate copy, logos, or call-to-action buttons.
- Frame key subjects using the Rule of Thirds based on the intended media channel (e.g., 9:16 or 4:5 vertical for socials, 16:9 horizontal for web hero banners).
Phase 5: Non-Linear Refinement (Re-Entrancy)
Because you built this workflow using Smart Objects:
- Double-click the Camera Raw Filter entry listed directly under your layer in the Layers Panel at any point.
- Re-opening Camera Raw restores every slider and color wheel exactly as you left it, so you can adjust your adjustments, or make new ones whenever you want.
Nice work!