This tutorial shows how to render your After Effects video or animation in Adobe Media Encoder
This last step is what makes (or renders) your After Effects project file (.aep) into a final MP4 video. The versatile MP4 format can be used almost anywhere:

My final Adobe Media Encoder settings
Once your After Effects project is ready to render:
- In After Effects, File > Export > Add To Adobe Media Encoder Queue…
- Be patient, this may take a few seconds as Adobe Media Encoder opens
- In Adobe Media Encoder, this window will open:
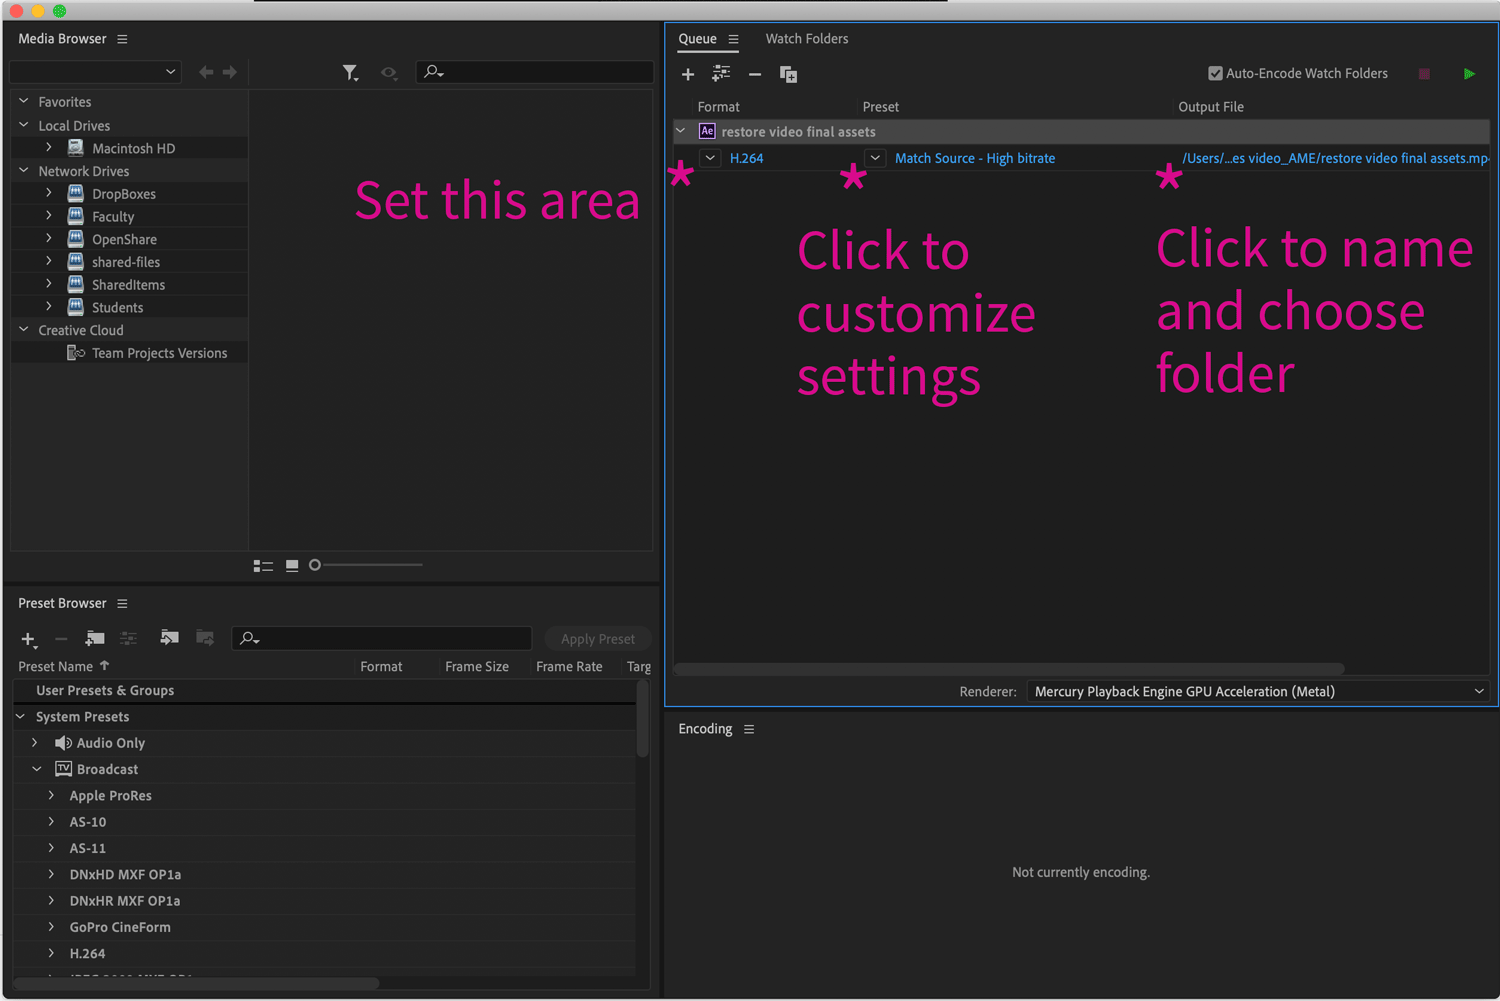
- In the upper right pane, make sure H.264 is selected
- Under Preset, select Match Source – High Bitrate
- Then click on Match Source – High Bitrate (click on the text)
- The window below will pop up. Enter or double-check the settings marked below.

Next, click on the blue type under Output File and name your final video and tell it where to save it.
Then, click the little green play arrow in the upper right (Image 1 on this page) to render your video.
Lastly, locate your rendered MP4 video and play it through to make sure it’s what you want.
Good work!
1. Recommended Bitrate Settings
- For 1080p (Full HD): Use a Target Bitrate of 15–20 Mbps and a Maximum Bitrate of 25–30 Mbps.
- For 4K (UHD): Aim for a Target Bitrate of 40–60 Mbps.
- VBR 2-Pass: This is still recommended for maximum quality as it analyzes the entire video first to optimize data distribution.
- How It Works (The Two Passes)
- Pass 1 (Analysis): The encoder “watches” your entire video from start to finish to find the “busy” parts (high motion, lots of detail) and the “quiet” parts (static backgrounds, slow movement). It creates a “map” but does not actually create the final video file yet.
- Pass 2 (Execution): Using the map from the first pass, it builds the final file. It intelligently “spends” more data (bitrate) on the complex, fast-moving scenes to keep them clear and “saves” data on simpler scenes where extra detail isn’t needed.
- Key Benefits
- Higher Quality at Smaller Sizes: Because it knows exactly where to allocate data, it can achieve better visual clarity than a single pass at the same file size.
- Consistent Quality: It helps prevent “blockiness” or pixelation in sudden fast-motion scenes because it already knew they were coming and saved up enough data to handle them.
- How It Works (The Two Passes)
2. High-Quality Render Settings
To ensure the best visual fidelity, enable these specific checkboxes in the Media Encoder export settings:
- Use Maximum Render Quality: Essential when scaling or using high-detail compositions.
- Render at Maximum Depth: Helps maintain color accuracy, especially if you worked in 16-bit or 32-bit color in After Effects.
- Profile & Level: Ensure your Profile is set to High and Level to at least 4.2 to support higher bitrates and resolutions.
3. (Optional) Workflow Optimization: The “Master File” Method
Many professionals avoid rendering directly to H.264 through Media Encoder for complex projects.
- Render a Master First: Render from After Effects directly to the Render Queue using a high-quality, “lossless” codec like QuickTime ProRes 422 or ProRes 4444.
- Transcode to H.264: Bring that ProRes “master” into Media Encoder to create your final H.264 version. This is often faster and less prone to crashes or artifacts.
4. Codec Choice (H.264 vs. H.265)
- H.264 (AVC): Best for universal compatibility across all devices and social media.
- H.265 (HEVC): Ideal for 4K or HDR content, as it provides similar quality to H.264 at roughly half the file size. Use this if file size is a concern and your target platform supports it.
5. Performance Tips
- GPU Acceleration: Set the “Renderer” in Media Encoder to Hardware Acceleration (Mercury Playback Engine) for faster renders. Use “Software Only” if you encounter strange visual glitches.
- Multi-Frame Rendering: Ensure this is enabled in After Effects preferences to utilize all CPU cores.