This Photoshop tutorial covers:
- Merge several landscape photos together
Tutorial file
Tutorial: Photoshop – Photomerge Cityscape
This is what our final merged cityscape image will look like:

I shot nine photos of the cityscape and merged them with Photoshop’s photomerge tool. Here are the nine photos:

The last image shows how I overlapped each photo so Photoshop has enough of the image to analyze to help it successfully merge them.
Cityscape photomerge – step-by-step
- I placed all nine photos in a folder (I left them exactly as they were shot – jpegs)
- Next, I used Photomerge in Photoshop. File > Automate > Photomerge
- I clicked Browse and selected all nine photos
- Layout > Auto
- I selected all four boxes were checked at the bottom: Blend Images Together, Vignette Removal, Geometric Distortion Correction, and Content-Aware Fill Transparent Areas.
- Click Okay
- Photoshop processes the nine photos. This took about 3 minutes.
- After Photoshop merges the photos it creates a file that has nine layers and one layer with the final merged image
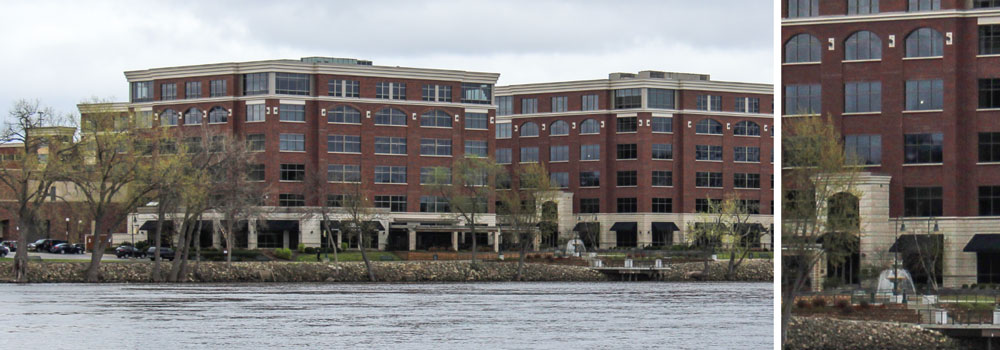
Final merged cityscape image

It’s small on this screen but there is a lot of detail to allow me to enlarge it and make a large print.
Here’s a detail of two buildings
This image was enhanced with the camera raw filter in Photoshop. It makes quite a difference!
In Photoshop choose Filter > Camera Raw Filter…
Here are the camera raw settings I used. There’s no magic here, just adjust the highlights, mid-tones, and shadows with your keen eye for detail and color.
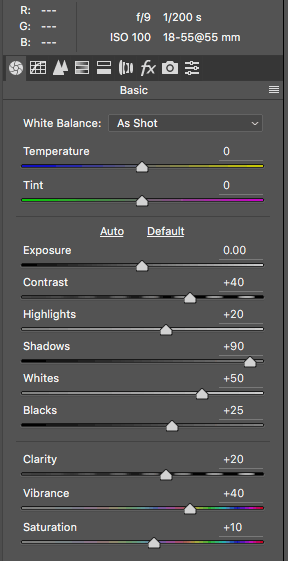
and here’s what the photo looked like before and after the camera raw adjustments

We’ll go through the photomerge process in class, together. It’s a powerful tool and a real time-saver.
Enjoy!